In order to activate the in-app purchase module in your iOS app, you need to have an Apple Developer account. If you don’t have an Apple Developer account and want to learn how to do it, see How to Open an Apple Developer Account? You can learn it from the article.
First, you need to log in to your developer account and add your bank details.
If you opened your Apple Developer account, go to the appstoreconnect.apple.com/login page and sign in with your account information.
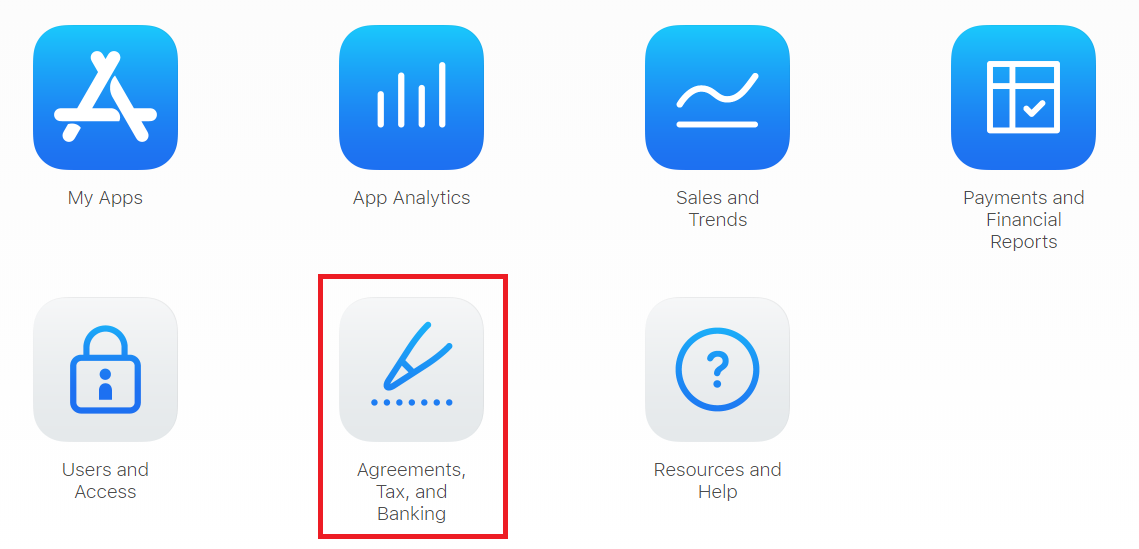
After logging in, click on the Agreements, Tax, and Banking tab from the menu that opens.
Click the View and Agree to Terms button on the far right of the Paid Apps row from the screen that appears.
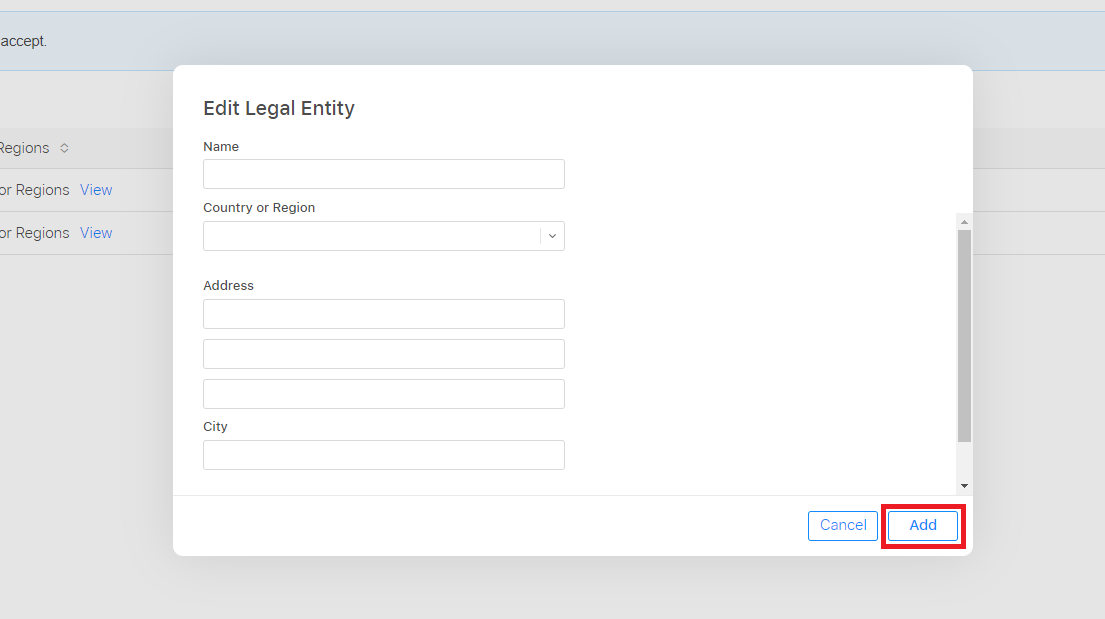
You will be asked to enter your Legal Entity information on the screen that opens.
Name: You must enter your Legal Entity name in this field.
Country or Region: You need to enter Country / Region information in this section.
Address: You need to enter your address information in this section.
City: You need to enter your city information in this section.
After entering all your information, click on the Add button.
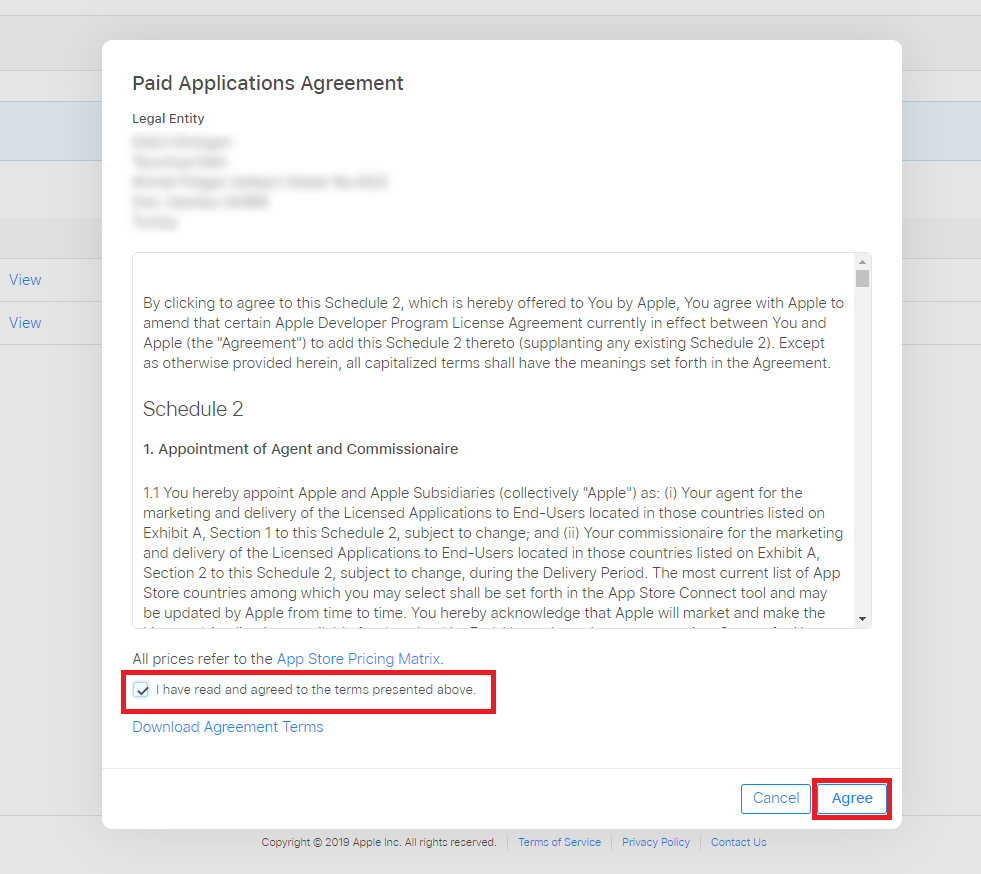
Then check the box below and click the Agree button to accept the terms.
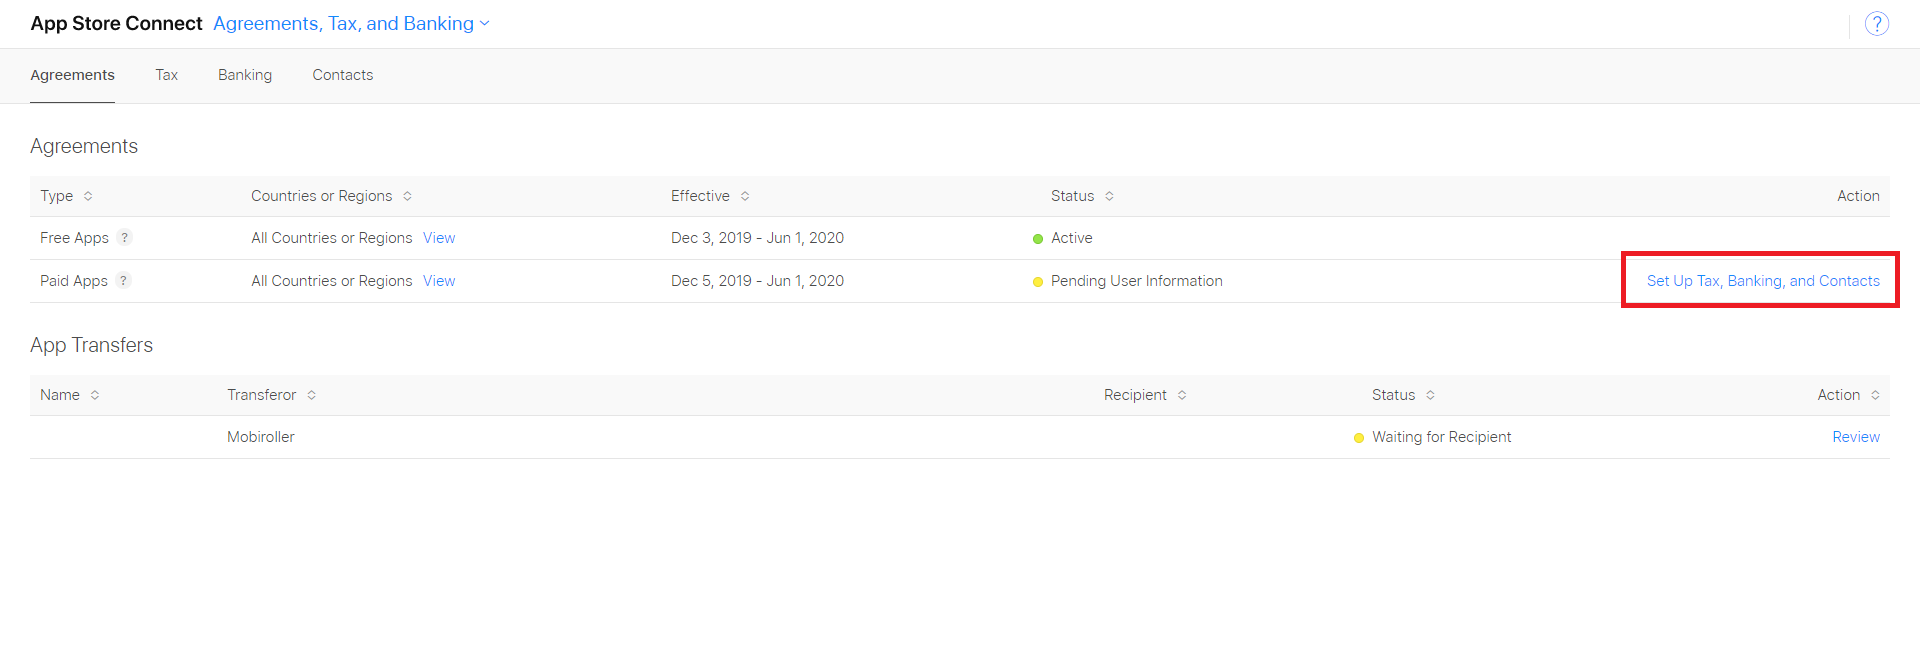
After accepting, click the Set Up Tax, Banking, and Contacts button.
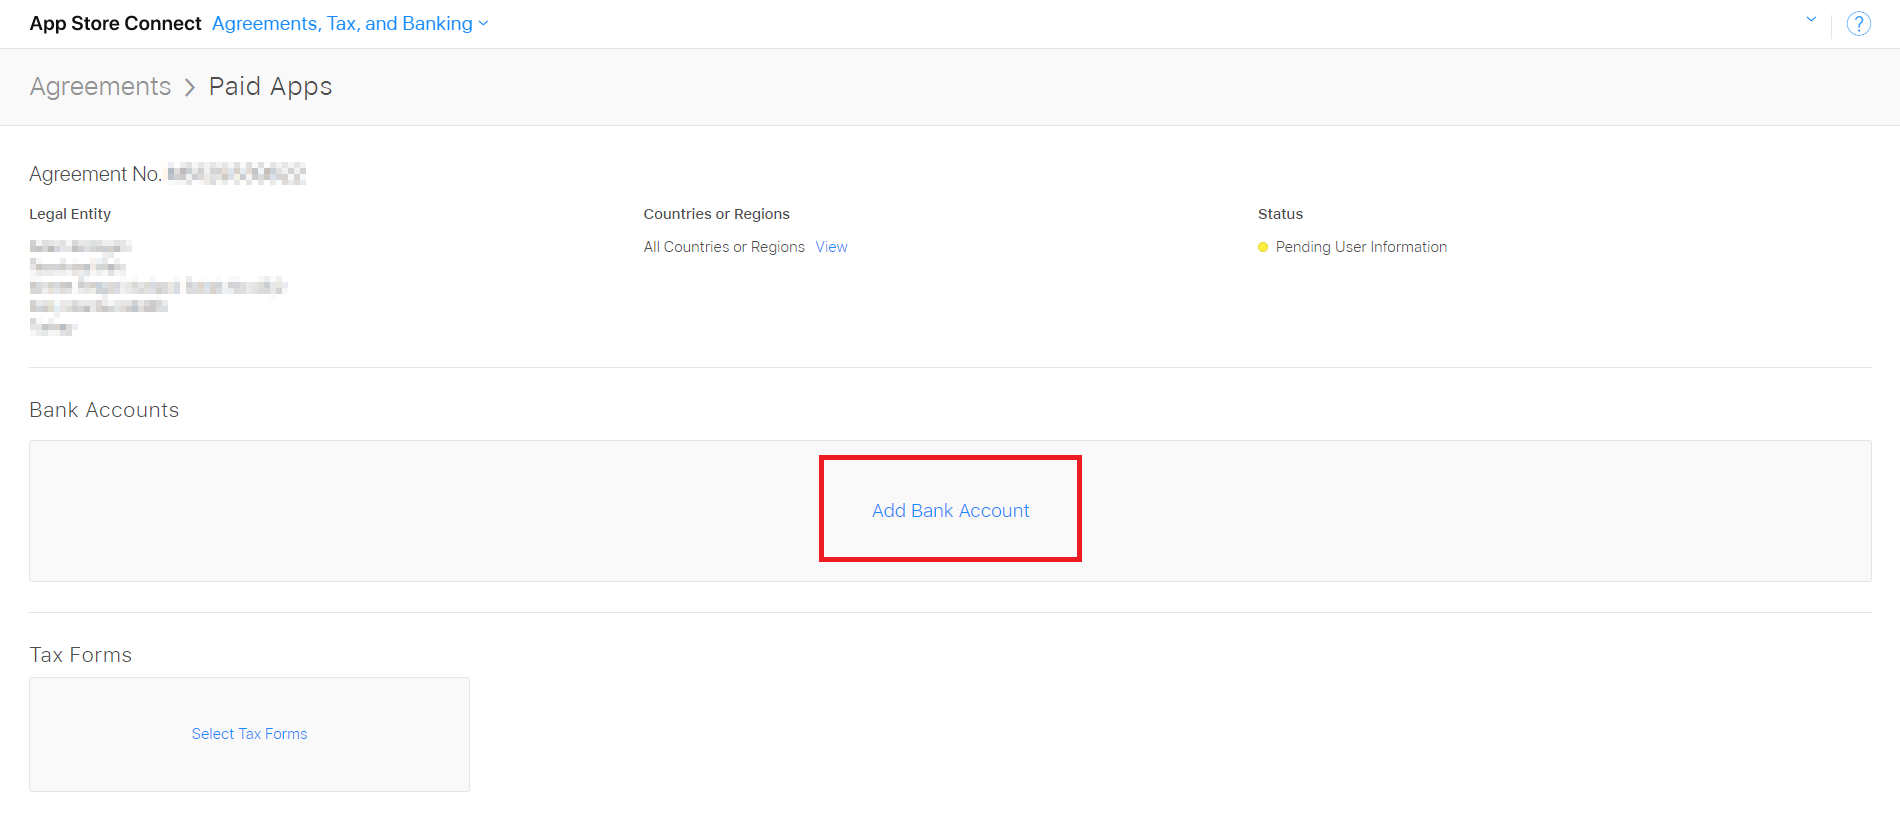
On the page that opens, go to the page where you will add your bank information by clicking the Add Bank Account button.
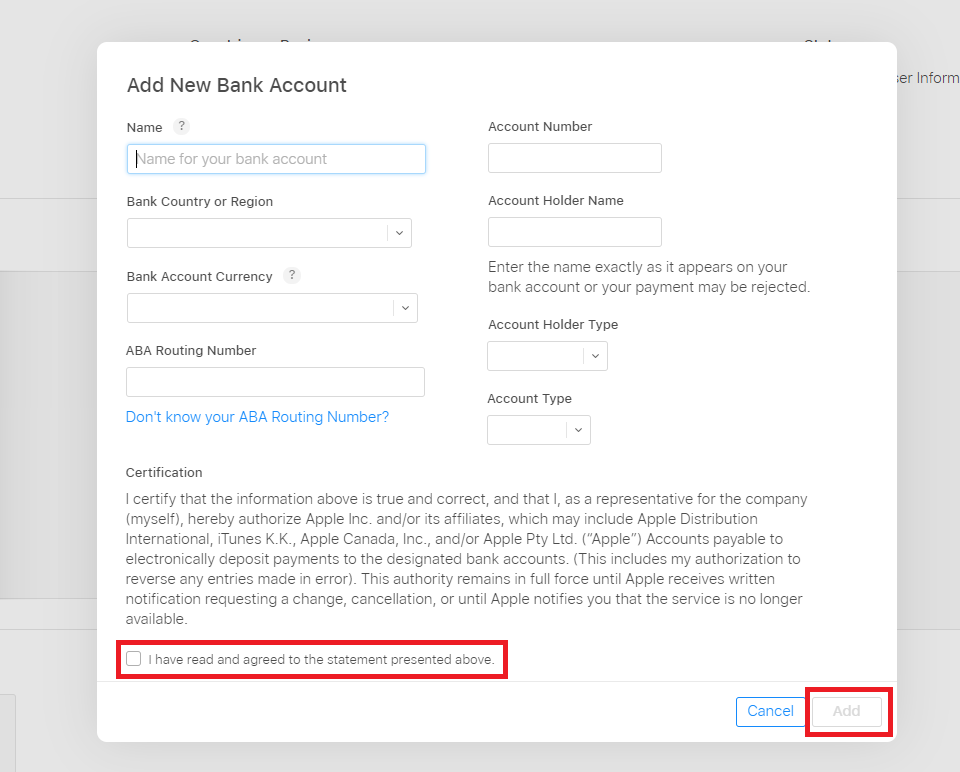
Then add the requested information to the relevant fields.
Name: You must write the name of your bank in this field.
Bank Country or Region: You must write the country/region of your bank.
Bank Account Currency: From this section, you must select your bank’s currency.
ABA Routing Number: You should write the Bank Code/Branch Code here.
Account Number: In this part, you should write the last 17 digits of your IBAN number without any spaces.
Account Holder Name: In this section, you must enter the “Account Holder Name” that appears directly in your bank account. Otherwise, your payment may be declined.
Account Holder Type: Here you have to choose whether the bank account is individual or business.
Account Type: You must choose whether your bank account is a current account or a savings account.
After entering all your information, activate the “I have read and agreed to the statement presented above” button and click the “Add” button.
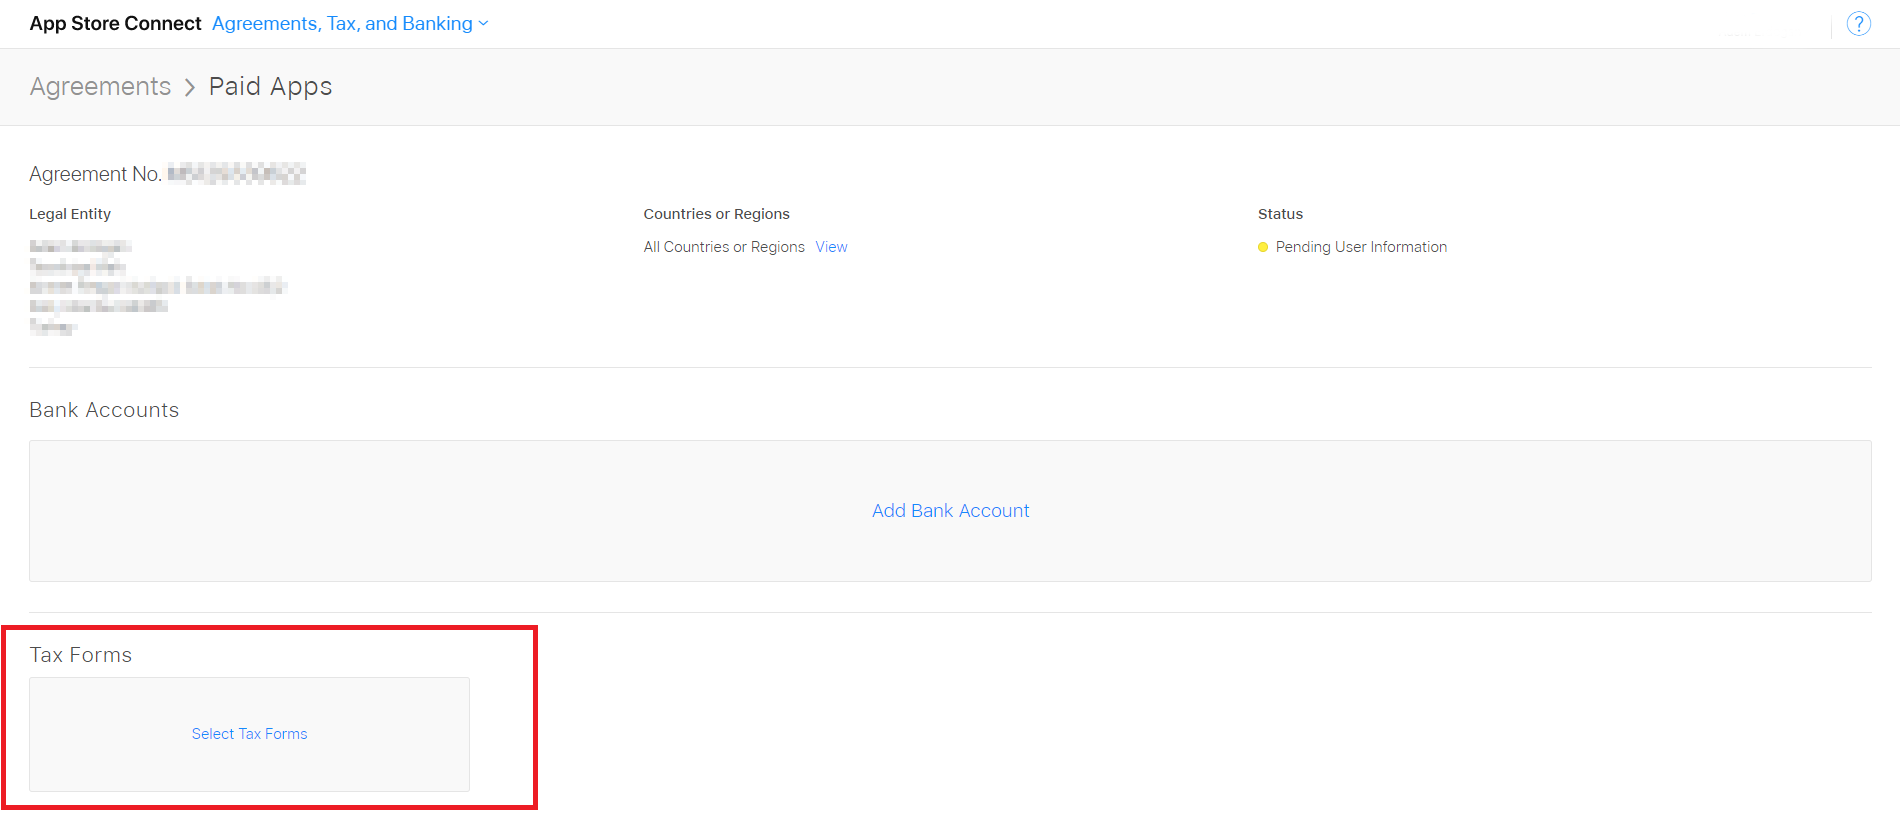
Next, click the Select Tax Forms button from the Tax Forms in the main panel.
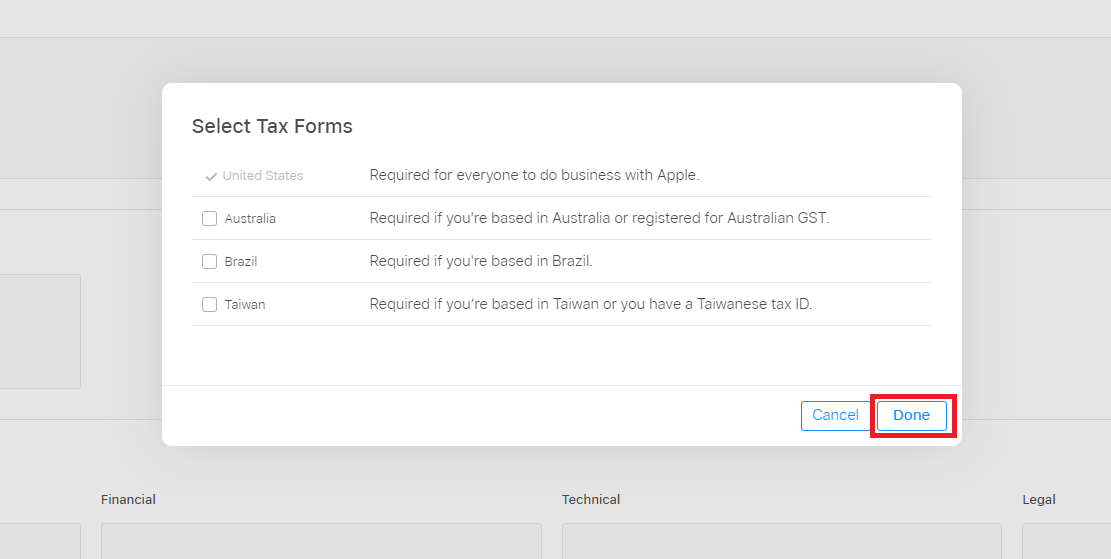
From the window that opens click the Done button without making a setting change. (If you live in one of the countries below, you can choose them if your taxation will be in those countries.)
If you are an American citizen, owner of an establishment in America, have a residence permit in the USA, or if you have a business, in short, if you have any US taxation, activate the Yes button from the popup window. If you don’t have any links, activate the No button and click the Submit button.
If you have any business activity in America, click the Yes button, otherwise activate the No button and click Submit.
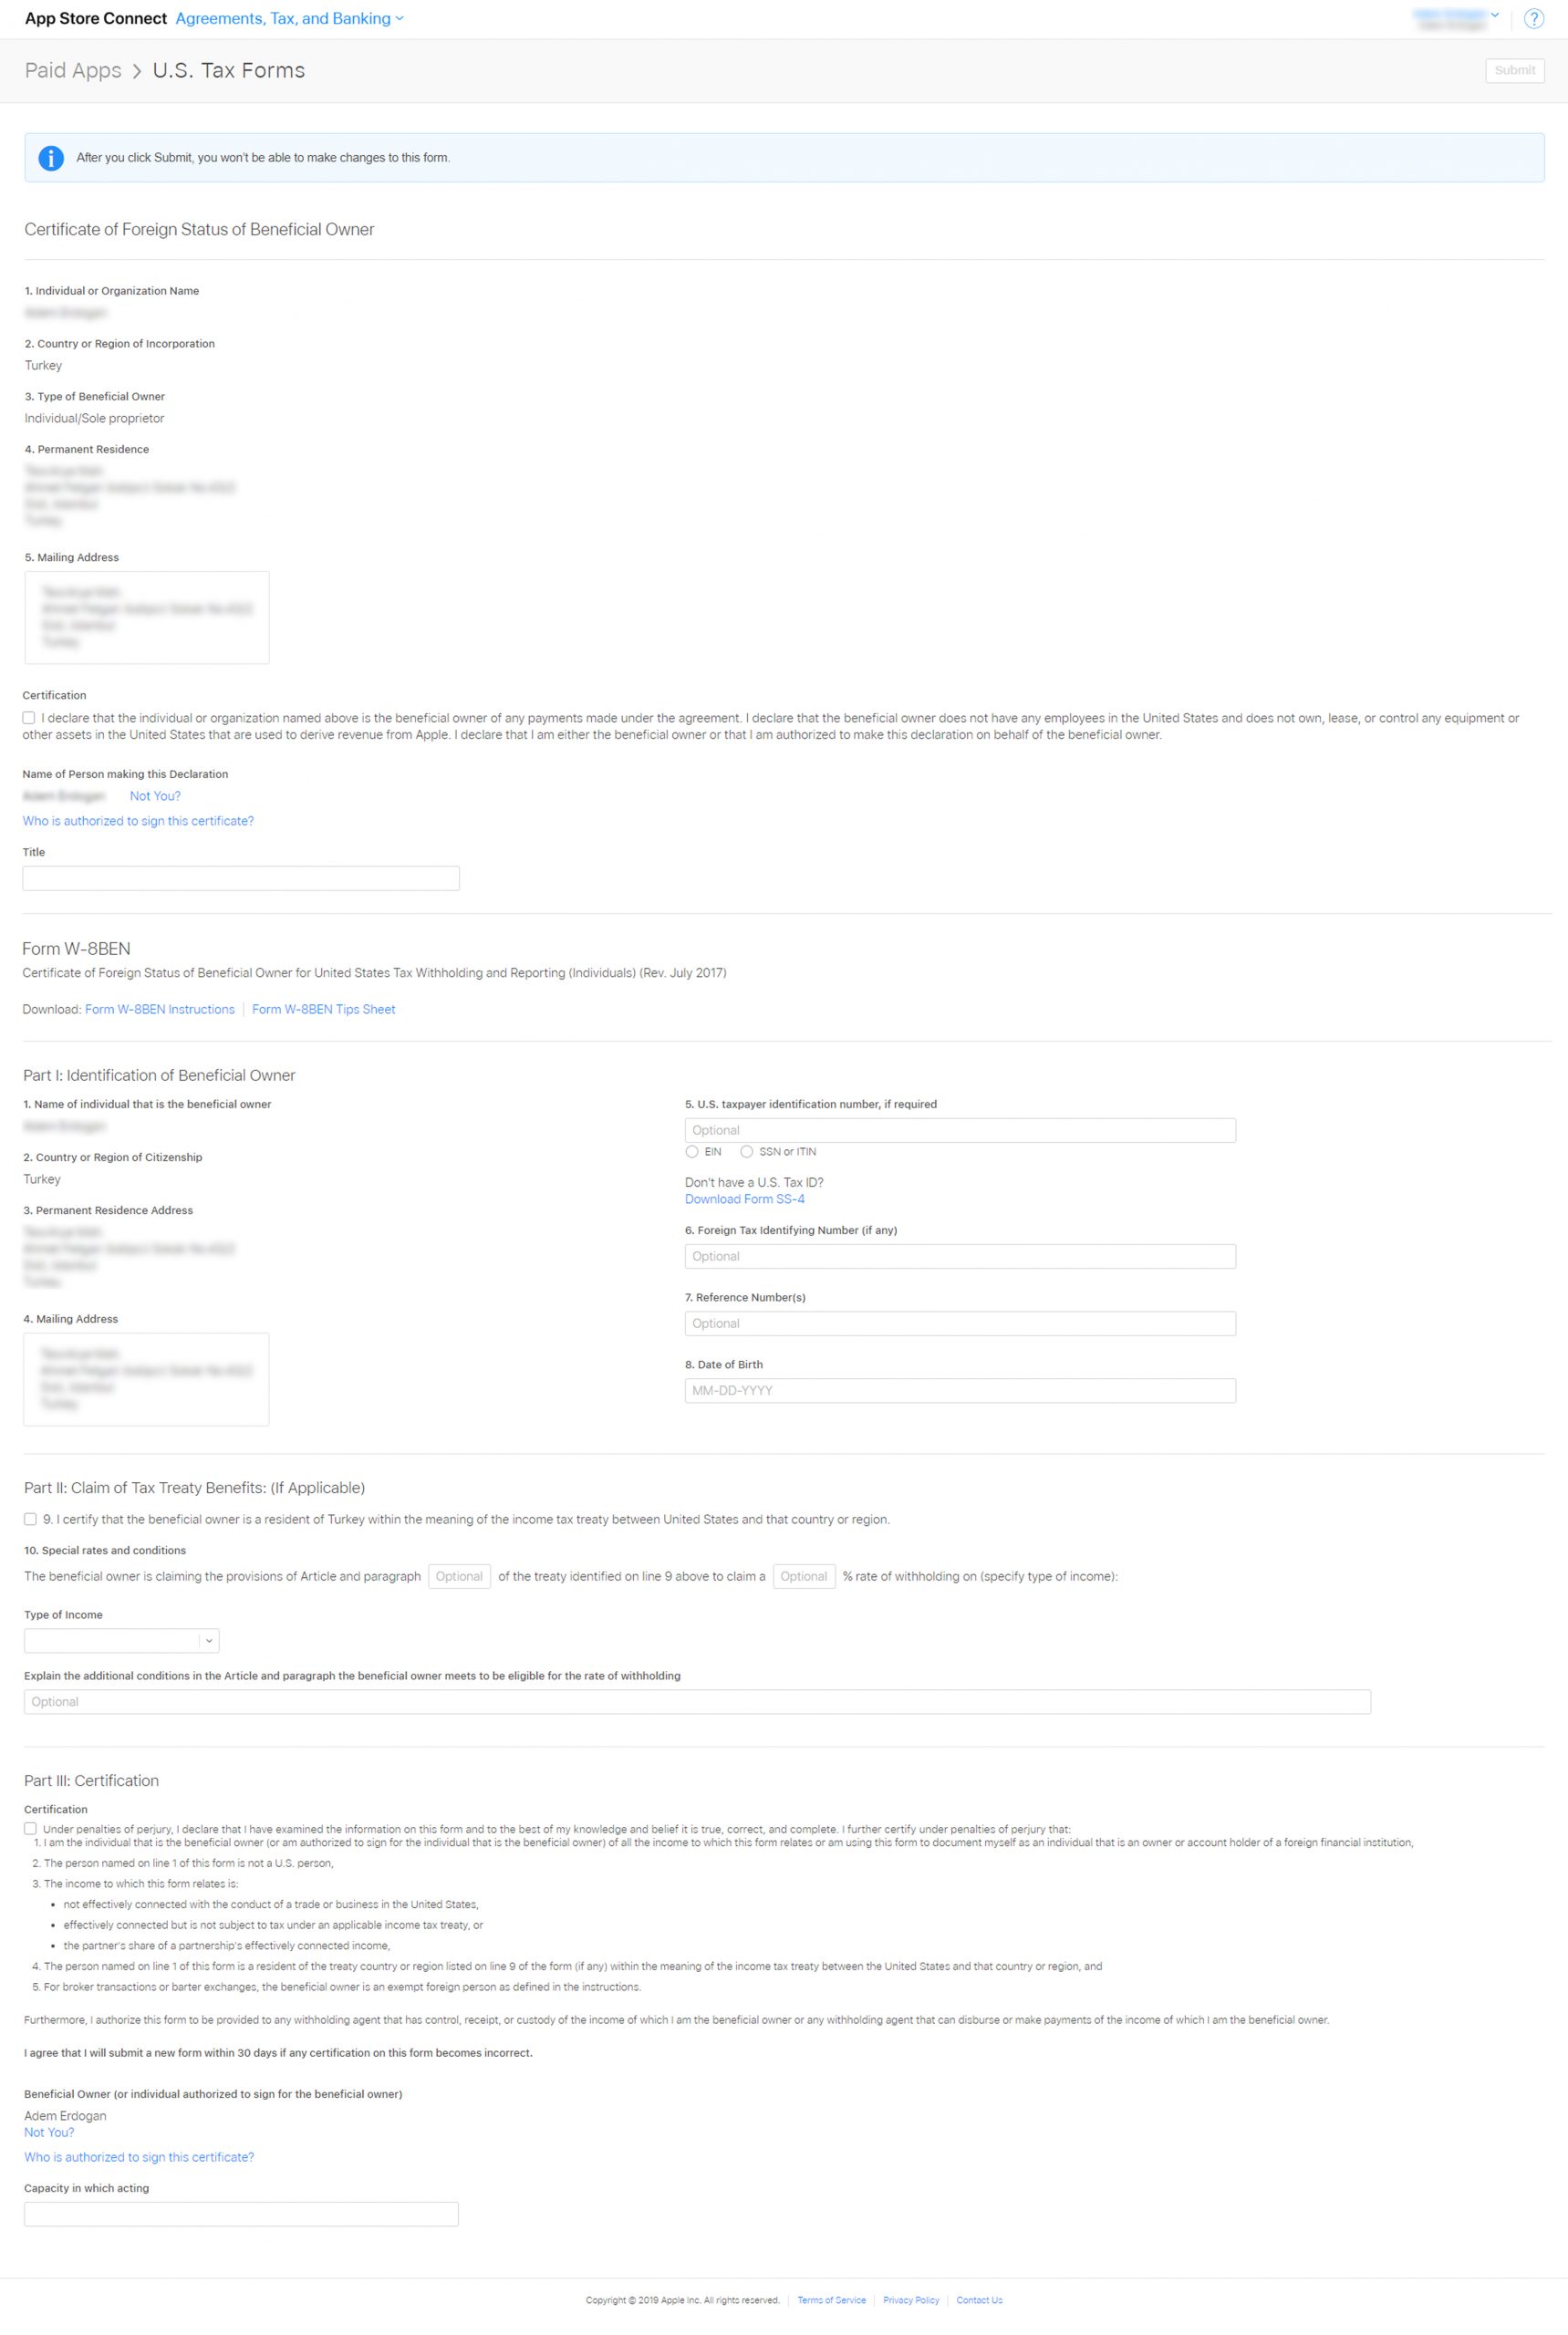
You must fill in the form that will appear later. You do not have to fill in the optional parts. You should remember that you can not edit the form once you fill it in, and you should make sure that you enter the information correctly.
Fill in the form, after clicking the Submit button at the top right, you will be automatically directed to the main screen. Then you must enter at least 1 link (person) from the Contacts section.
First Name: You must enter your name in this field.
Last Name: You must enter your last name in this field.
Title: You must enter a title for your contact here.
Phone Number: You must enter the number of the person you added here.
After adding at least one contact, click on Agreements, Tax, and Banking.
Next, you should wait for Apple to check and activate the information. This can happen immediately or, it can usually take some time to verify the bank information. Waiting for it to be active does not prevent other operations from being performed. You can continue doing the other steps.
Then click on the Agreements, Tax, and Banking heading and click on My Apps.
You will see your app list if you have any. If you want to install the In-App Purchase module on the app you want to choose, you should select that app.
After opening the app, click the Manage tab from the screen that appears. Click on the plus (+) sign in the In-App Purchases section from the screen that will seem. You will be able to add products here.
At this stage, you must choose the purchase format of the product you will add. You need to choose whether the product you will sell will be a one-time sale or a monthly renewal from this section. If you do not want to read the details of all sales types after learning the most suitable for you below, you can go to the descriptions of the type you have selected in our article by clicking on the titles.
Consumable:
This option means a one-time sale. If the user who has purchased a product wants to use the product or service again after using it, he has to make a repurchase. For example: Buying cat food from a veterinary practice.
Non-consumable:
This option means an indefinite sale. Users pay a one-time fee for any product or service and can own and use this product or service forever. For example: Buying a new car model in a car racing game.
Auto-Renewable Subscription:
This option refers to the subscription system that is paid monthly. This type of purchase makes a dynamic product or service available to the user for a certain period of time. The subscription continues until the user cancels. For example: Subscribing monthly to a streaming service app.
Non-Renewing Subscription:
The difference of this option from monthly subscription is that it can be purchased annually and the product or service can be static. For example: Accessing the entire archive of a journal for a year.
Consumable (One-Time Sale)
If you choose the Consumable (One-Time Sales) option, you will see the parts you need to fill.
Reference Name: The reference name is the name that will be used in App Store Connect, Sales, and Trend reports. It will not be displayed in the App Store, so you can enter any name here. This name must not be longer than 64 characters.
Product ID: You must enter a product name in this field. It must contain letters and numbers. It must be a unique name and even if you delete the product, you can not use it in another product. So you have to enter carefully. You will also use this code when entering the same product in the Mobiroller panel.
Availability: After placing a tick here, you mark the product as ready for in-app purchases and start waiting for approval from Apple.
Pricing: In this section, you must select the price at which you will sell your product. Current prices are available at Apple. If you are not satisfied with the current prices, you can find alternative prices when you go to the bottom of the price list. When you select the appropriate one for your product, the Other Currencies button will appear next to it, you can immediately see how much it will be sold in other countries by clicking.
The information you enter in the App Store Information section will be visible in the Apple App Store.
Localizations: You can enter names and descriptions in different languages by clicking the plus (+) button next to this section.
Display Name: The name you enter here is the part that will appear in the Apple App Store.
Description: The description entered here will appear in the Apple App Store.
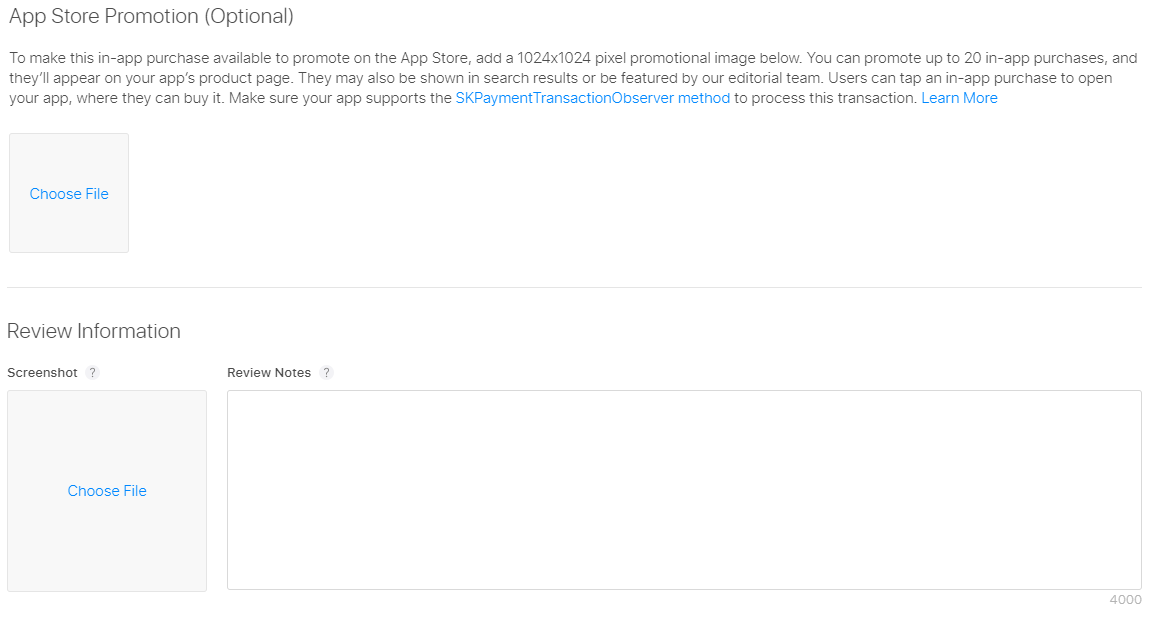
App Store Promotion (Optional)
The images you will enter in this section are optional.
Review Information
The images and notes you enter in this field should be about your product. The information entered here is to assist the Apple team with their review.
Screenshot: You can add the image of your product here.
Review Notes: You can write notes about your product here to forward them to the Apple team.
After filling in the relevant fields, click the Save button to save.
If you are adding products to Mobiroller and Apple for the first time, click the In-App Purchases button.
Next, click the App-Specific Shared Secret button in the upper right corner of the product you added.
Click the Generate App-Specific Shared Secret button from the small window that pops up.
After clicking the button, you will see a code. Copy this code and Do Not Lose it. You will use this code in the Mobiroller panel.
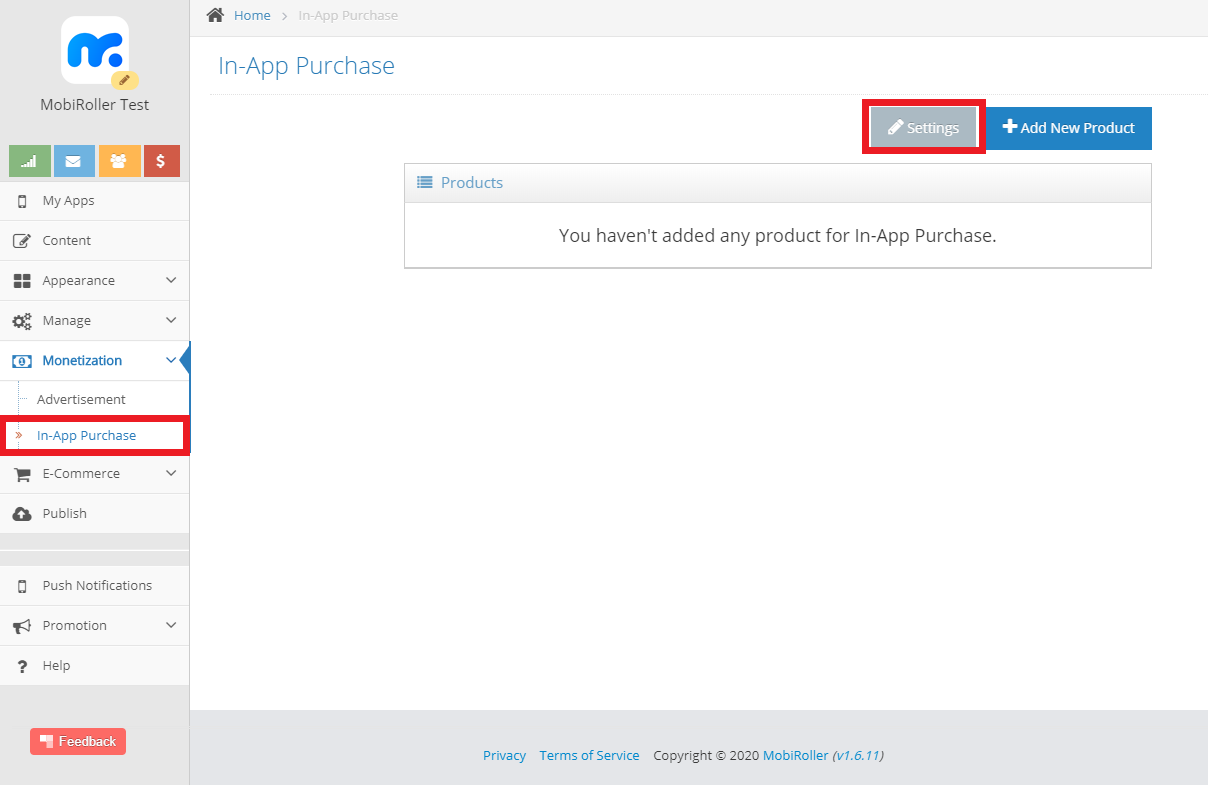
After copying the code, go to your Mobiroller panel and click the In-App Purchase button from the Monetization tab. If you have not entered this tab before and made your settings, click now.
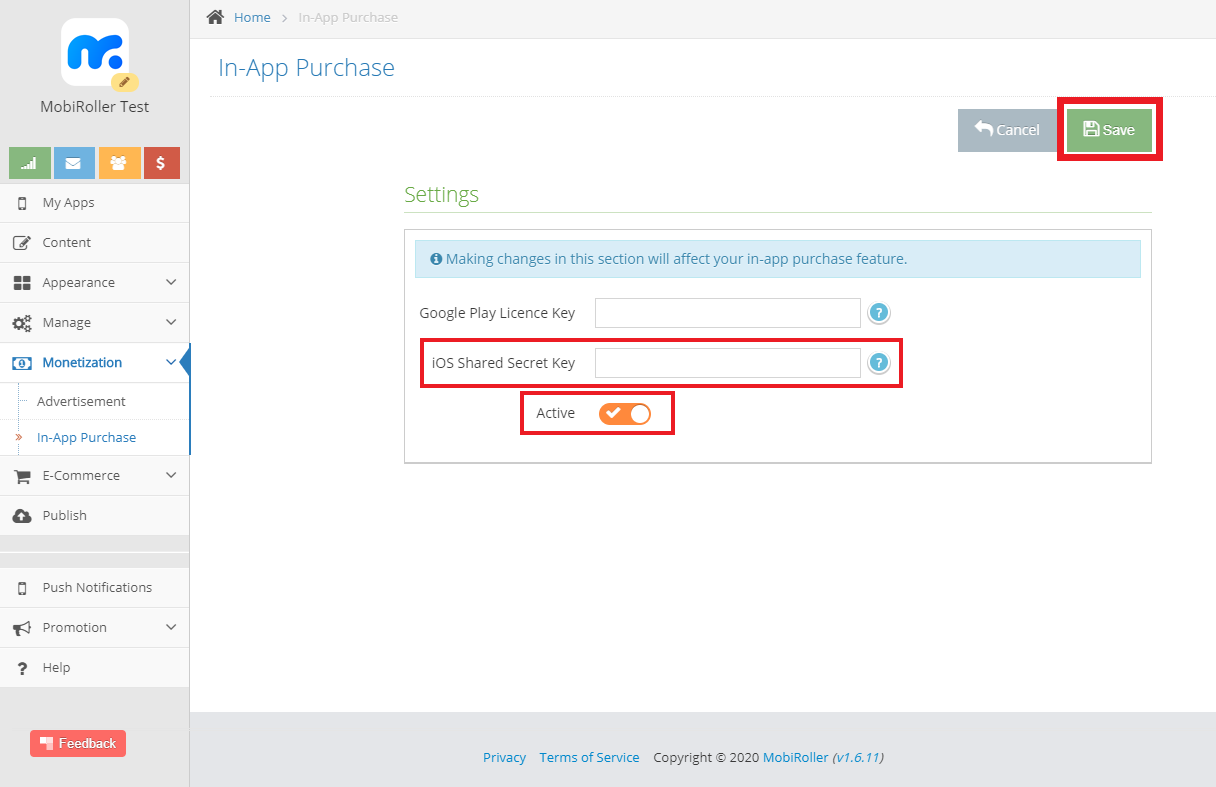
After activating the Settings section of the code you copied, paste it into the iOS Shared Secret Key section and press the Save button.
Then click the Add New Product button.
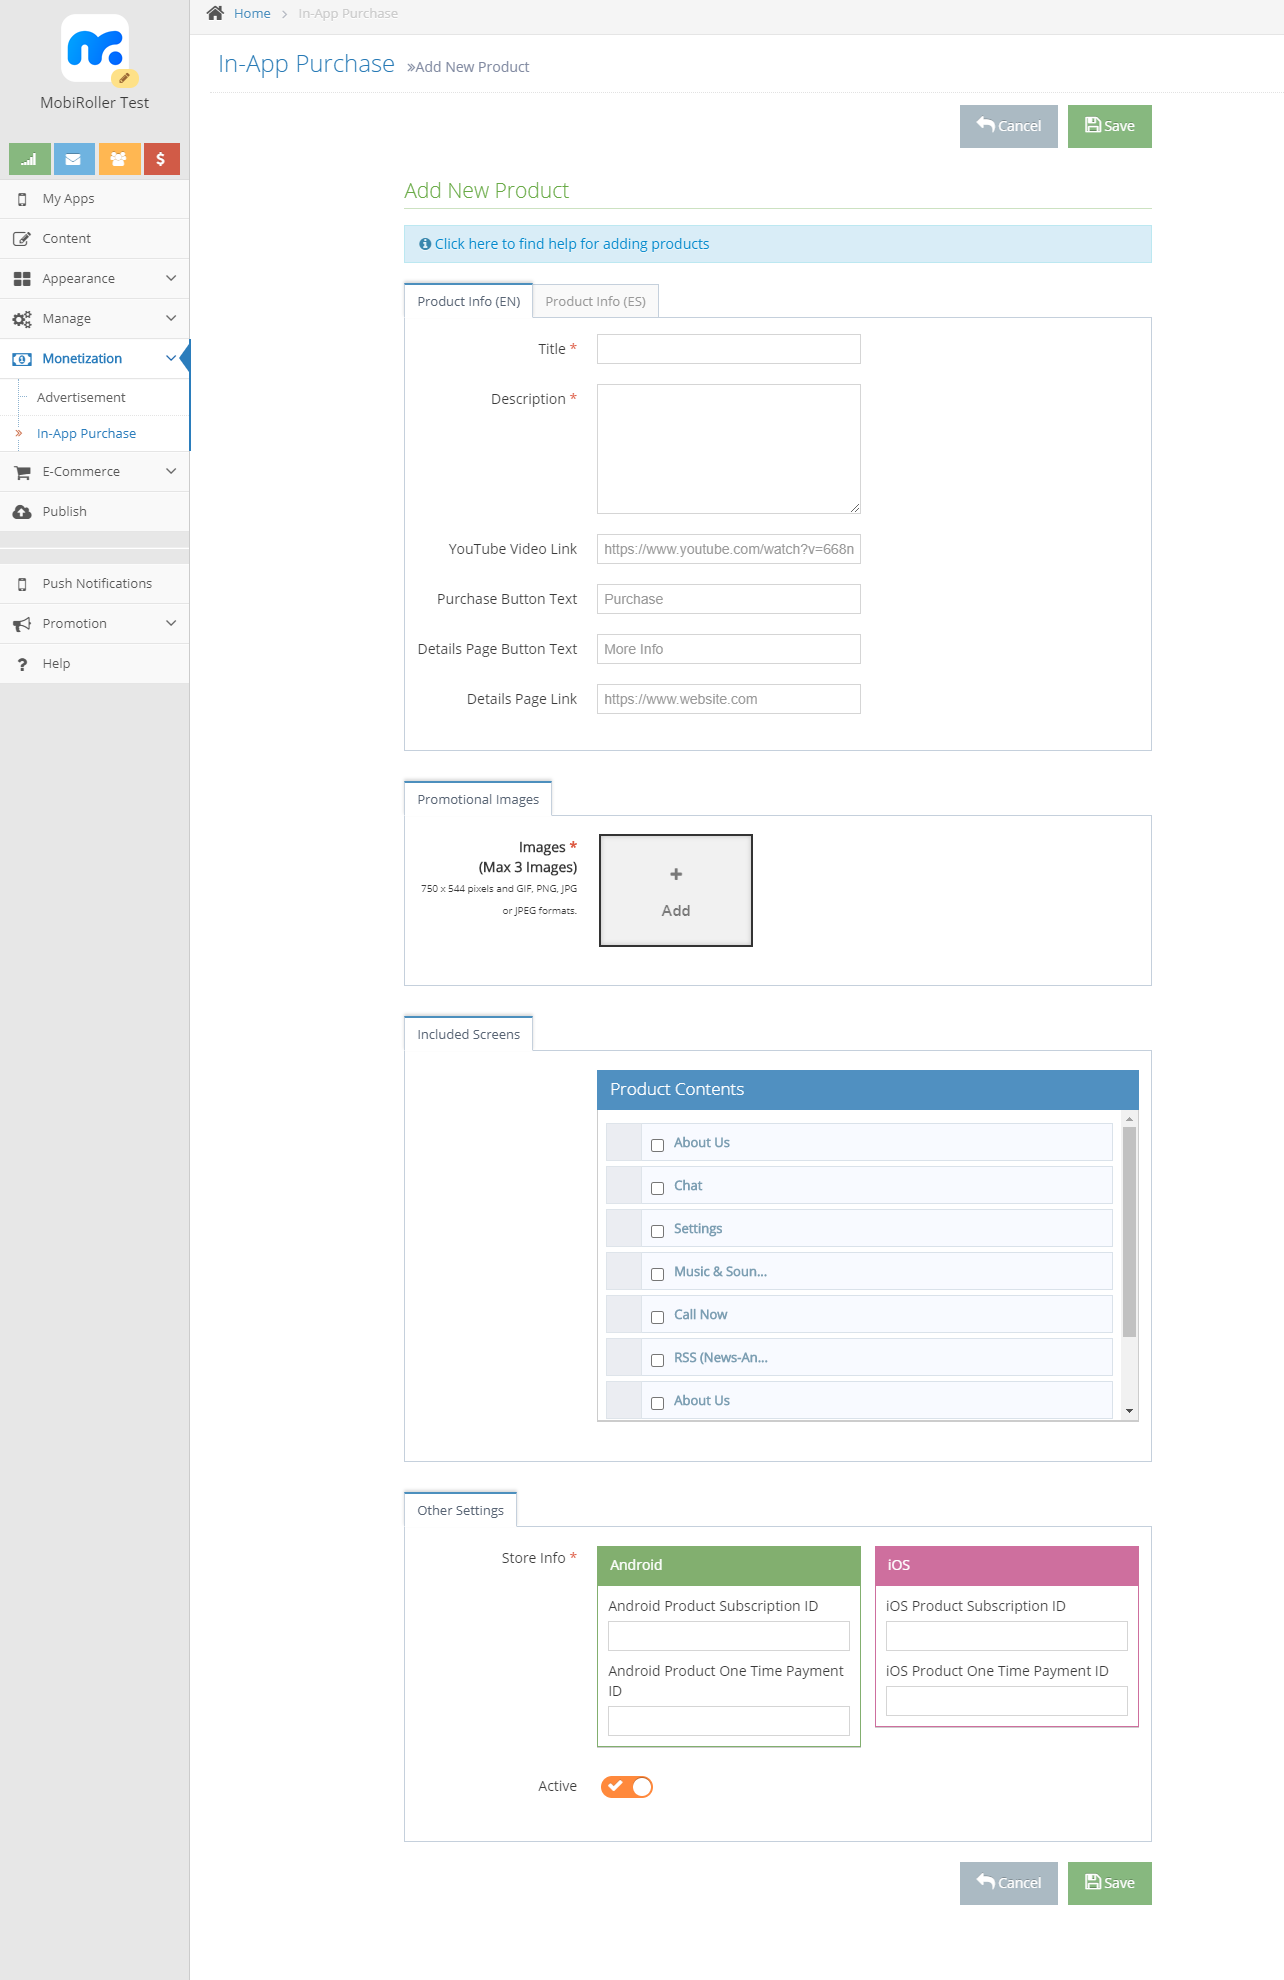
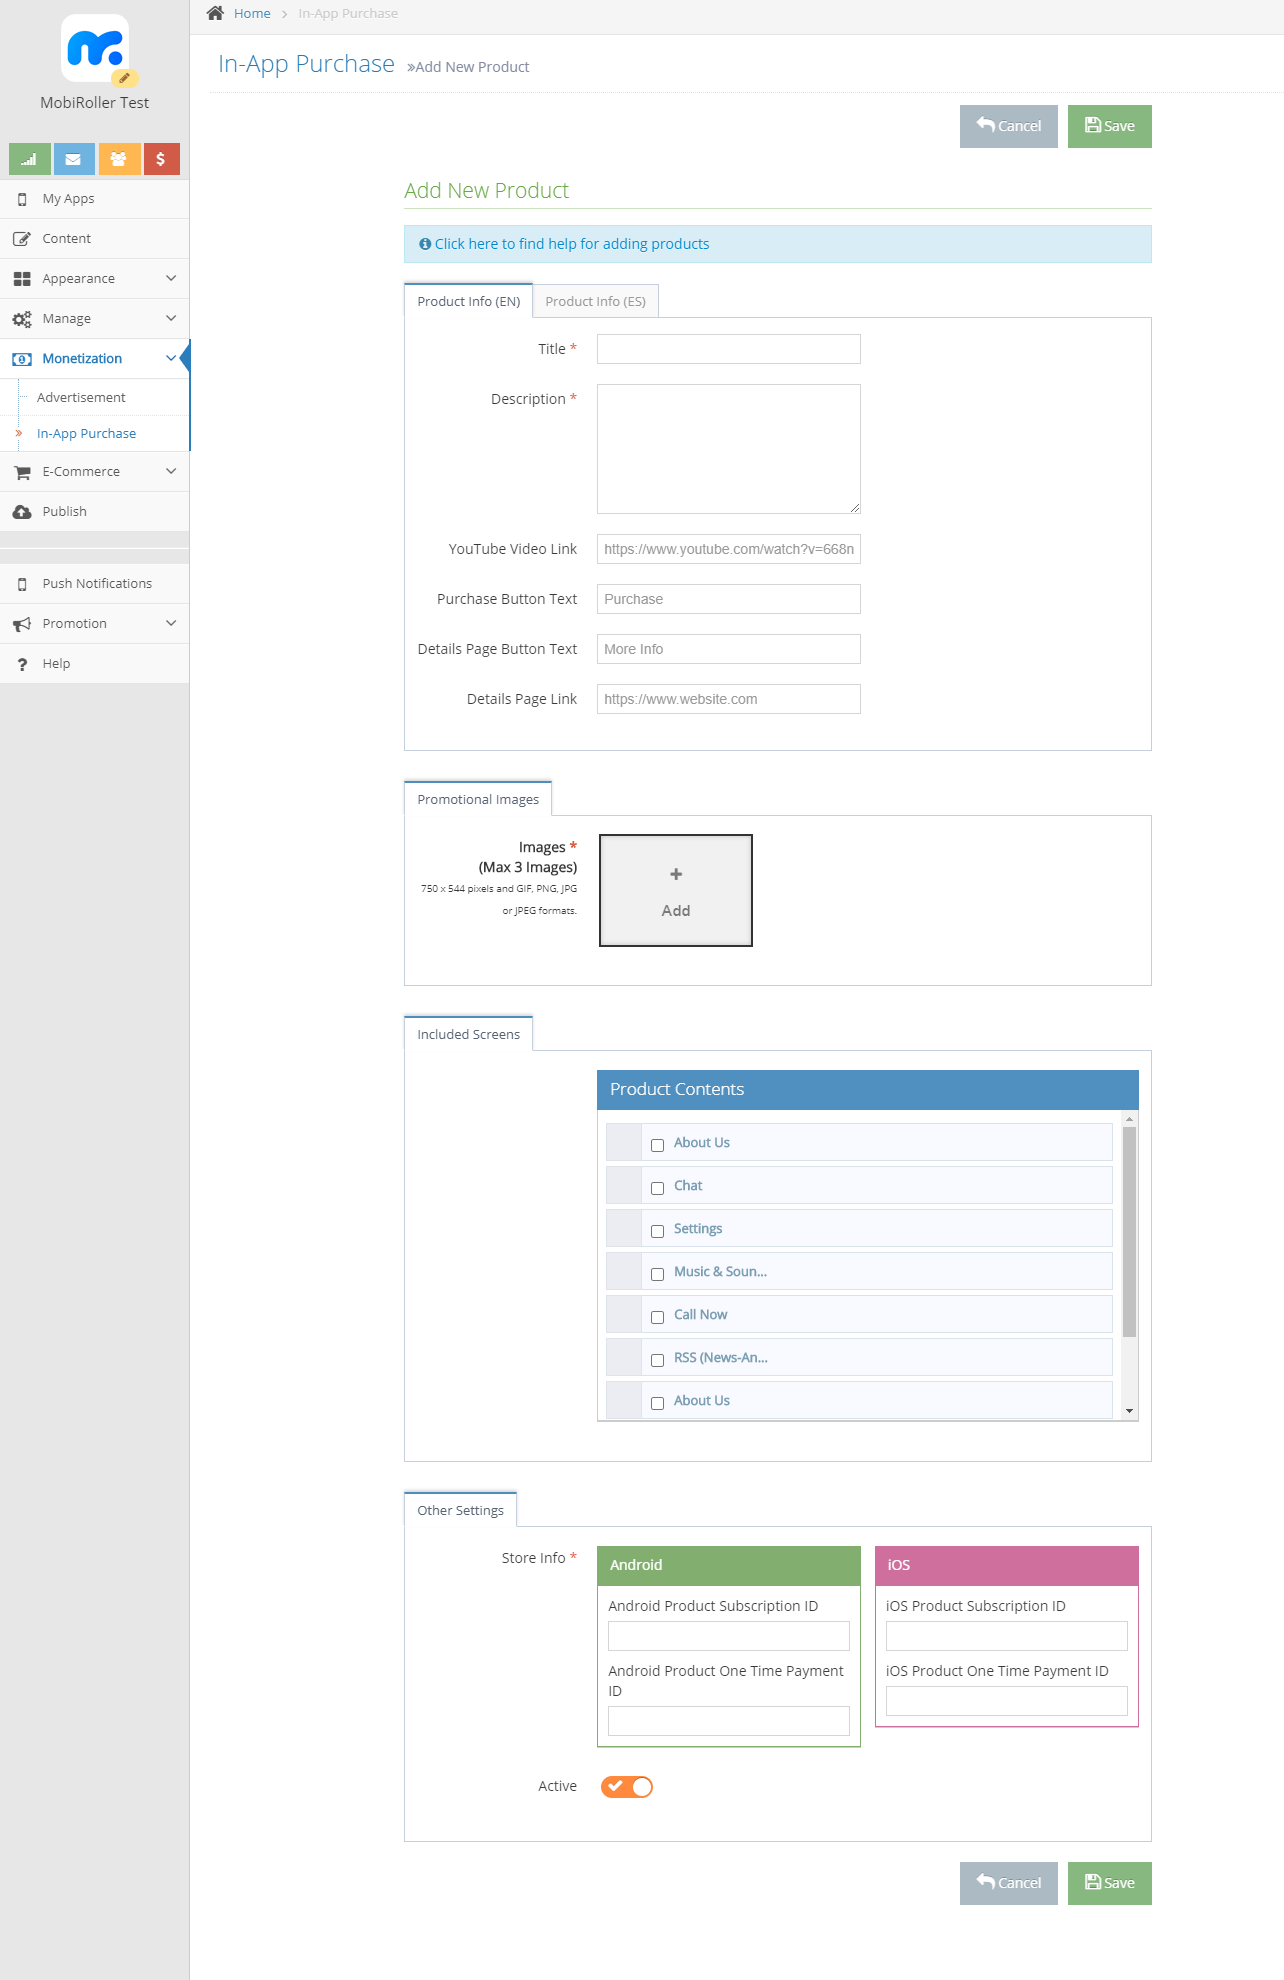
When the new product adding page opens, you must enter the information on the product you want to add. Remember, since the product you add here should be the same as the product you added to Apple, you should not enter the different information. If you have multiple language options, you must enter product information in those languages for each.
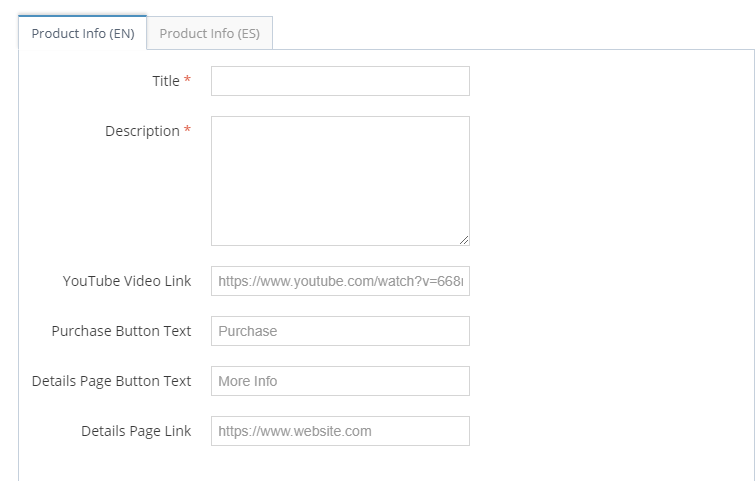
Title: You can enter the title of the product that the user will see before clicking the buy product button.
Description: You can enter the description of the product that the user will see before clicking the buy product button.
YouTube Video Link: You can enter the product introduction video that the user will see before clicking the buy button.
Purchase Button Text: After the user enters the product detail, you can change the name of the button that will direct the purchasing button here.
Detail Page Button Text: After the user has entered the product details, you can change the name of the button that will direct it to more details.
Detail Page Link: After the user has entered the product detail, you can enter the link assignment that will direct it to more details.
Promotional Pictures: You must enter the promotional pictures of your product here. You can upload max. 3 images. The size of the images must be 754×540 and have a JPG, JPEG, PNG, or GIF extension.
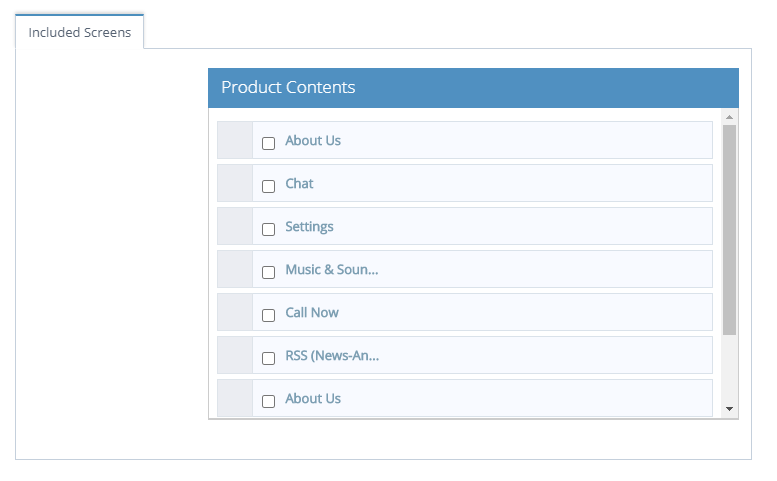
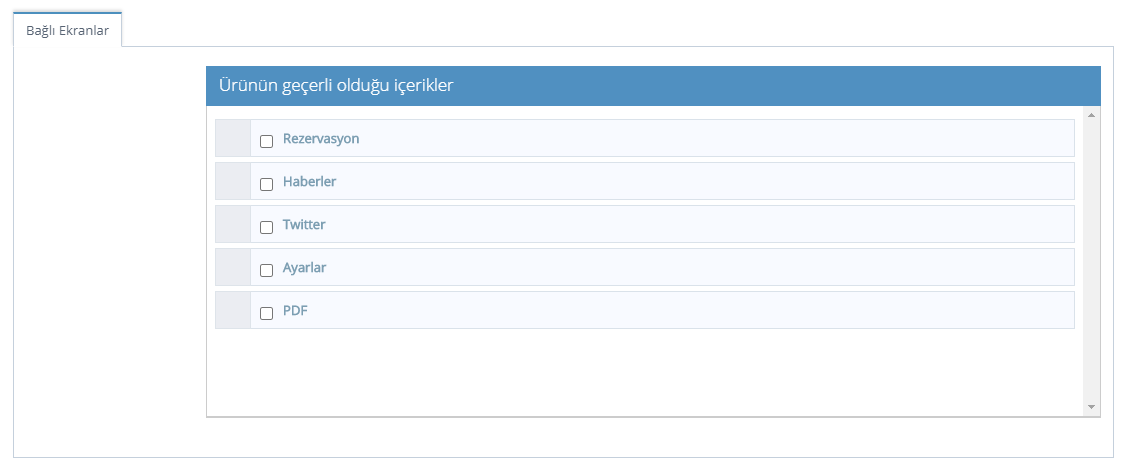
Included Screens: You can select the screens on which the products will appear.
Other Settings: When adding a product in the Mobiroller panel, you should write the Product ID you created in Apple (you can go back to the Product ID section and read it by clicking here) in the iOS Product One-Time Sales ID section in the Market Information section. Then Activate the button below and Save. If you turn off the active button, your product will not appear in your app.
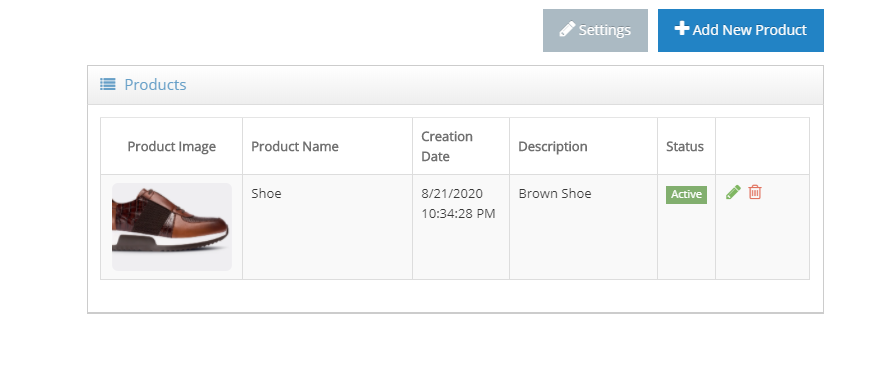
After registering, you will be directed to the page where you can see your products on a list. You can edit with the pen icon or delete your products by clicking the trash icon of your products.
Non-Consumable
If you choose the Non-Consumable (One-time, Lifetime Sales Option), you will see the parts you need to fill out.
Reference Name: The reference name is the name that will be used in App Store Connect, Sales, and Trend reports. It will not be displayed in the App Store, so you can enter any name here. This name must not be longer than 64 characters.
Product ID: You must enter a product name in this field. It must contain letters and numbers. It must be a unique name and even if you delete the product, you can not use it in another product. So you have to enter carefully. You will also use this code when entering the same product in the Mobiroller panel.
Availability: After placing a tick here, you mark the product as ready for in-app purchases and start waiting for approval from Apple.
Content Hosting: When you first create products on App Store Connect, you can have Apple host non-consumable in-app purchases or convert content you currently host on your own servers to be hosted by Apple. Apple provides a reliable and familiar experience for users and manages to place and restore products to their devices. When you host content with Apple, Apple stores the content of your app using the same infrastructure that supports other large-scale operations. Also, Apple automatically downloads Apple-hosted content in the background even if your app isn’t running.
The information you enter in the App Store Information section will be visible in the Apple App Store.
Localizations: You can enter names and descriptions in different languages by clicking the plus (+) button next to this section.
Display Name: The name you enter here is the part that will appear in the Apple App Store.
Description: The description entered here will appear in the Apple App Store.
App Store Promotion (Optional)
The images you will enter in this section are optional.
Review Information
The images and notes you enter in this field should be about your product. The information entered here is to assist the Apple team with their review.
Screenshot: You can add the image of your product here.
Review Notes: You can write notes about your product here to forward them to the Apple team.
After filling in the relevant fields, click the Save button to save.
If you are adding products to Mobiroller and Apple for the first time, click the In-App Purchases button.
Next, click the App-Specific Shared Secret button in the upper right corner of the product you added.
Click the Generate App-Specific Shared Secret button from the small window that pops up.
After clicking the button, you will see a code. Copy this code and Do Not Lose it. You will use this code in the Mobiroller panel.
After copying the code, go to your Mobiroller panel and click the In-App Purchase button from the Monetization tab. If you have not entered this tab before and made your settings, click now.
After activating the Settings section of the code you copied, paste it into the iOS Shared Secret Key section, and press the Save button.
Then click the Add New Product button.
When the new product adding page opens, you must enter the information on the product you want to add. Remember, since the product you add here should be the same as the product you added to Apple, you should not enter the different information. If you have multiple language options, you must enter product information in those languages for each.
Title: You can enter the title of the product that the user will see before clicking the buy product button.
Description: You can enter the description of the product that the user will see before clicking the buy product button.
YouTube Video Link: You can enter the product introduction video that the user will see before clicking the buy button.
Purchase Button Text: After the user enters the product detail, you can change the name of the button that will direct the purchasing button here.
Detail Page Button Text: After the user has entered the product details, you can change the name of the button that will direct it to more details.
Detail Page Link: After the user has entered the product detail, you can enter the link assignment that will direct it to more details.
Promotional Pictures: You must enter the promotional pictures of your product here. You can upload max. 3 images. The size of the images must be 754×540 and have a JPG, JPEG, PNG, or GIF extension.
Included Screens: You can select the screens on which the products will appear.
Other Settings: When adding a product in the Mobiroller panel, you should write the Product ID you created in Apple (you can go back to the Product ID section and read it by clicking here) in the iOS Product One-Time Sales ID section in the Market Information section. Then Activate the button below and Save. If you turn off the active button, your product will not appear in your app.
After registering, you will be directed to the page where you can see your products on a list. You can edit with the pen icon or delete your products by clicking the trash icon of your products.
Auto-Renewable Subscription
When you select Auto-Renewable Subscription, you will see the fields must be filled.
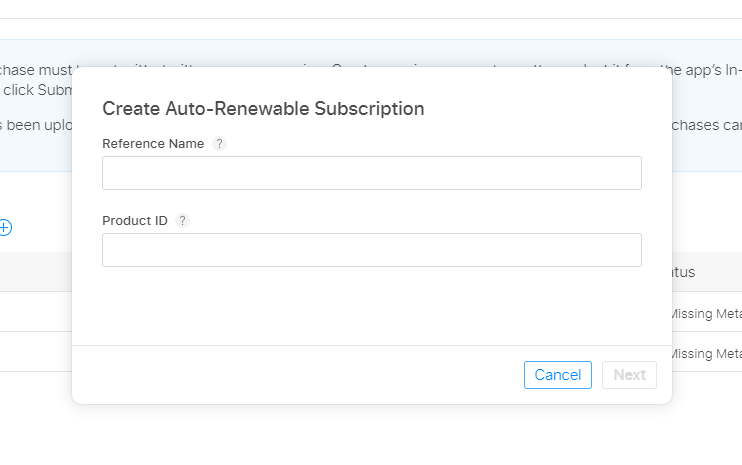
Reference Name: The reference name is the name that will be used in App Store Connect, Sales, and Trend reports. It will not be displayed in the App Store, so you can enter any name here. This name must not be longer than 64 characters.
Product ID: You must enter a product name in this field. It must contain letters and numbers. It must be a unique name and even if you delete the product, you can not use it in another product. So you have to enter carefully. You will also use this code when entering the same product in the Mobiroller panel.
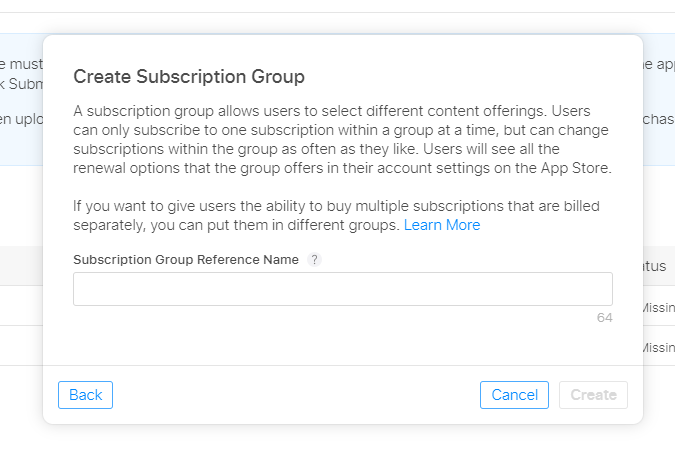
At this point, you need to create a subscription group. A subscription group allows users to choose different content offers. Users can subscribe to only one subscription at a time within a group, however, they can change subscriptions within the group as often as they want. Users will see all the renewal options offered by the group in their account settings in the App Store.
If you want to give users the ability to purchase multiple subscriptions that are billed separately, you can separate them into different groups.
Subscription Group Reference Name: The subscription group reference name will only appear on App Store Connect and in Sales and Trends reports. It will not appear in the App Store.
After specifying a group name, you will be directed to the product page to fill in other information about your product.
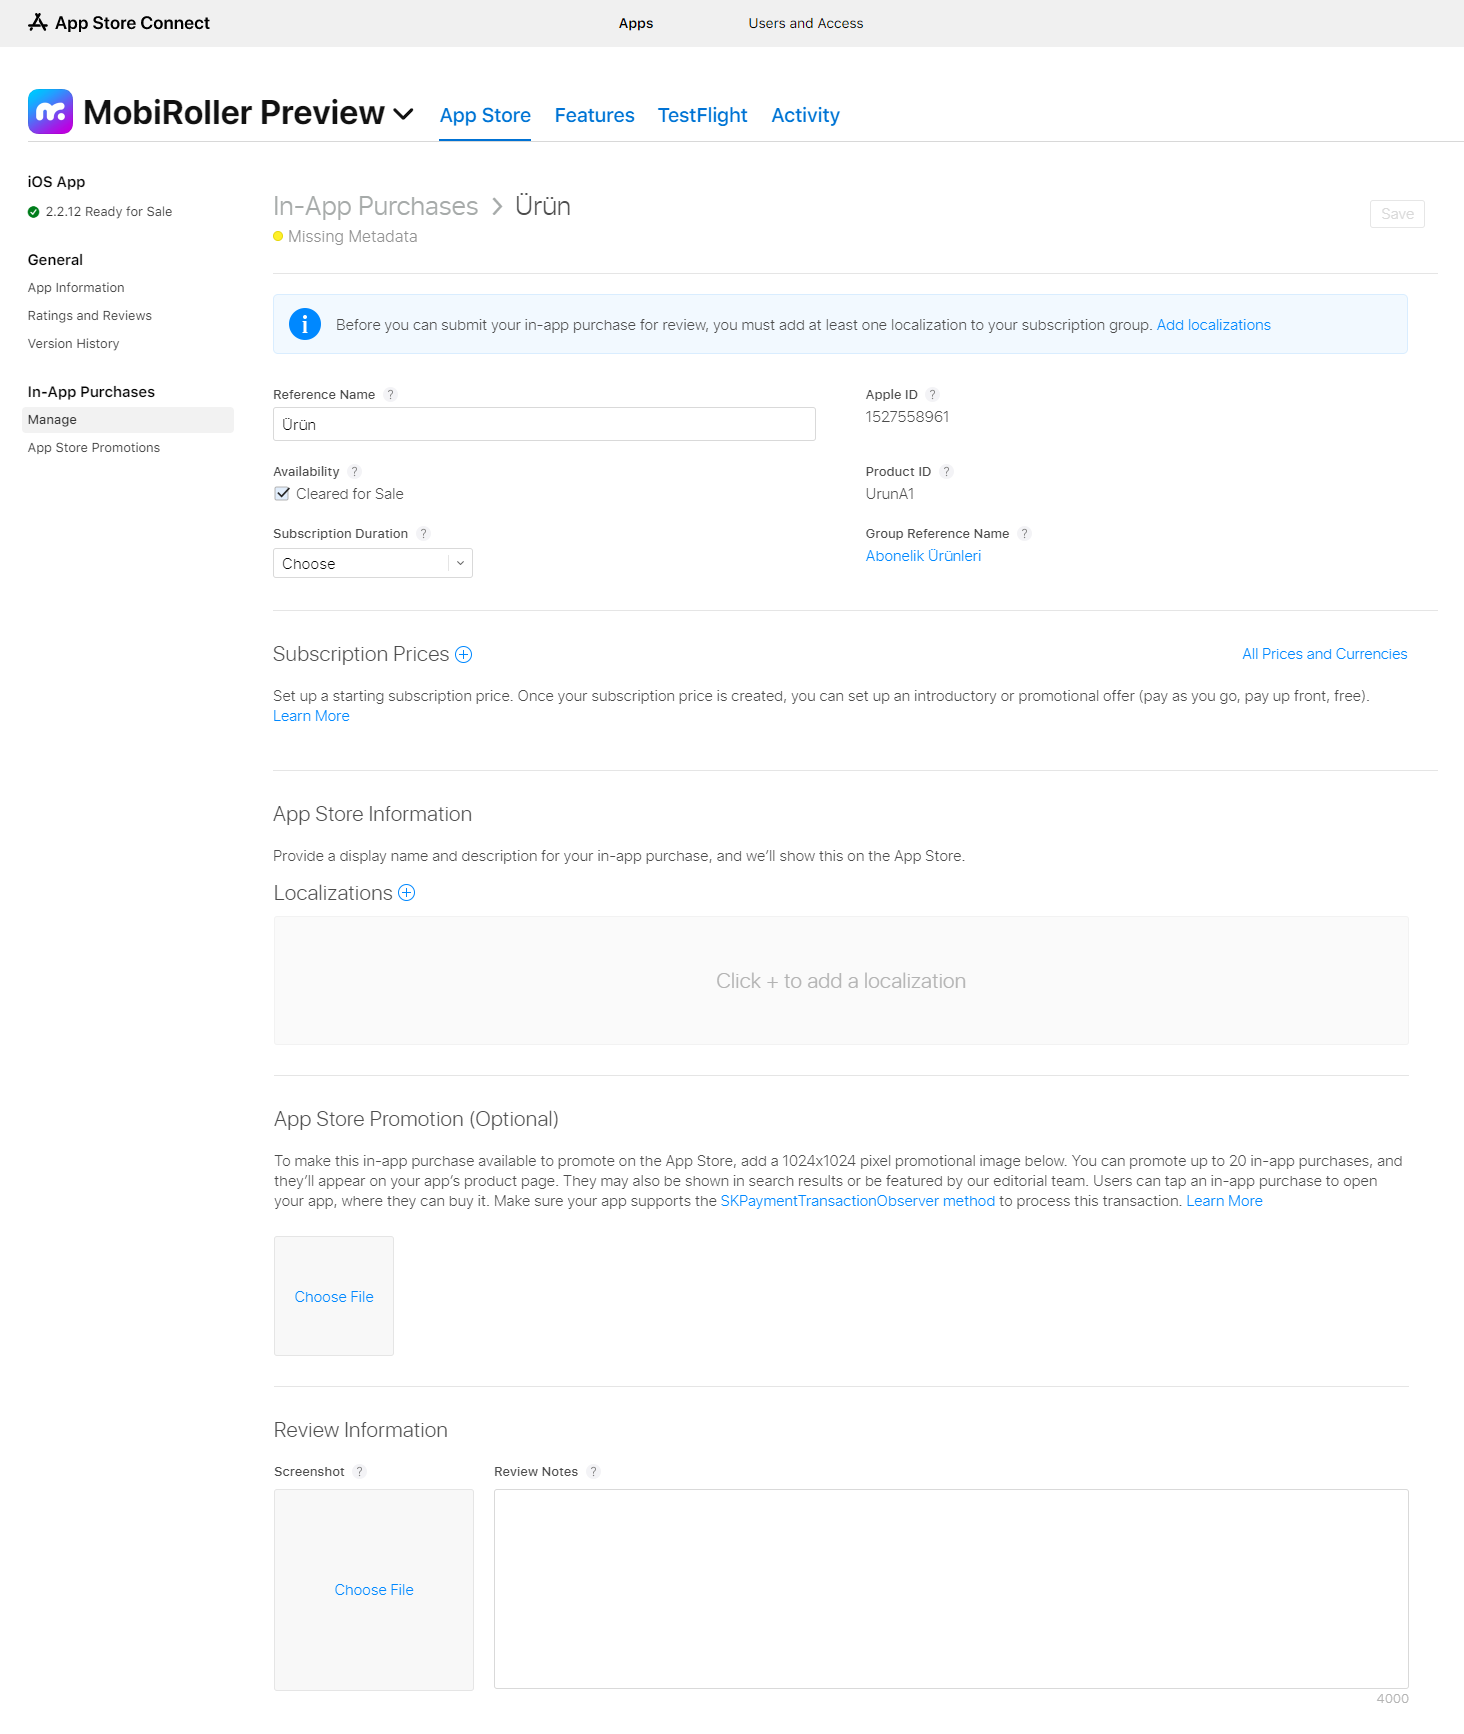
In the first part of the product page; Reference Name and Product ID will come as you fill in the first step. If you wish, you can change the Reference Name section.
Availability: After placing a tick here, you mark the product as ready for in-app purchases and start waiting for approval from Apple.
Subscription Duration: You must determine the duration of the subscription from this section. Options such as 1 week, 1 month, 2 months, 3 months, 6 months, and 1 year are available. At the end of this period, your user subscription to your product will be renewed. Auto-renewable subscriptions allow the user to purchase updates and dynamic content for a specified period of time. Subscriptions are automatically renewed unless the user cancels them.
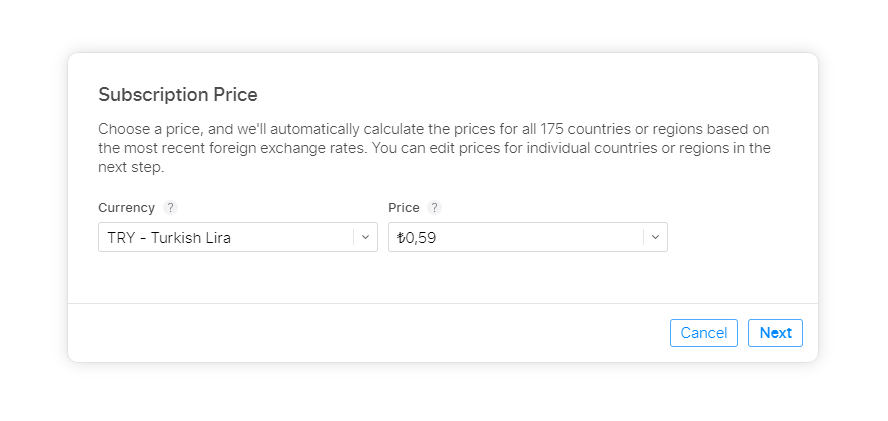
Subscription Price: This is where you set an initial subscription price. After your subscription fee has been created, you can create a promotional or promotional offer (eg: pay-as-you-go, prepay, free). Choose a price and Apple automatically calculates prices for all 175 countries or regions, based on the latest exchange rates. In the next step, you can edit the prices for individual countries or regions. After making your selections, click on the Next button.
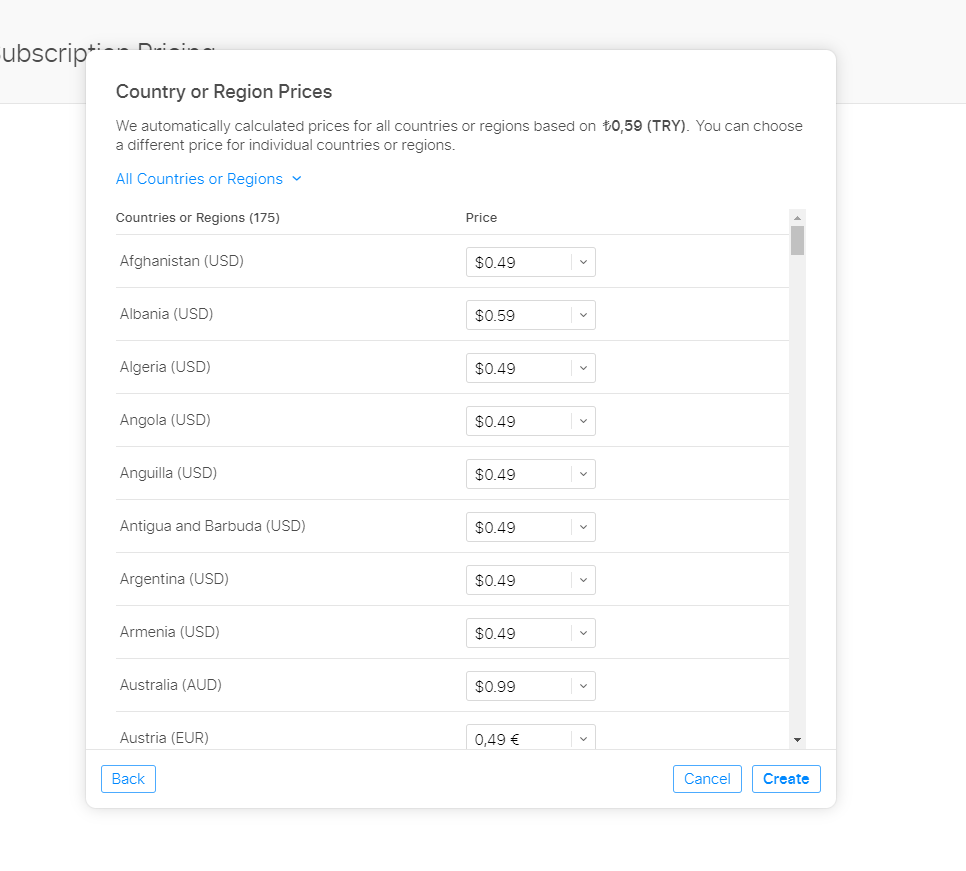
In this section, you will see the pricing in other countries according to the fee you choose. If you want, you can change the price of any country you want. After making your selections, click on the Next button.
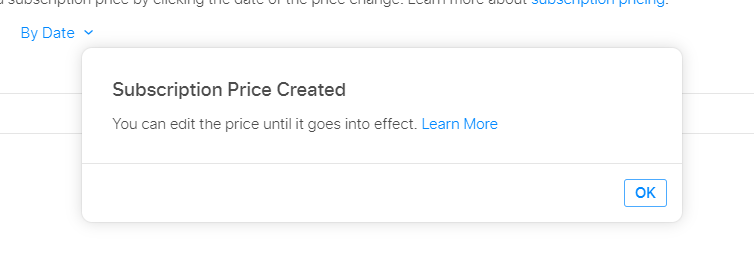
Close the screen that will appear by pressing the OK button.
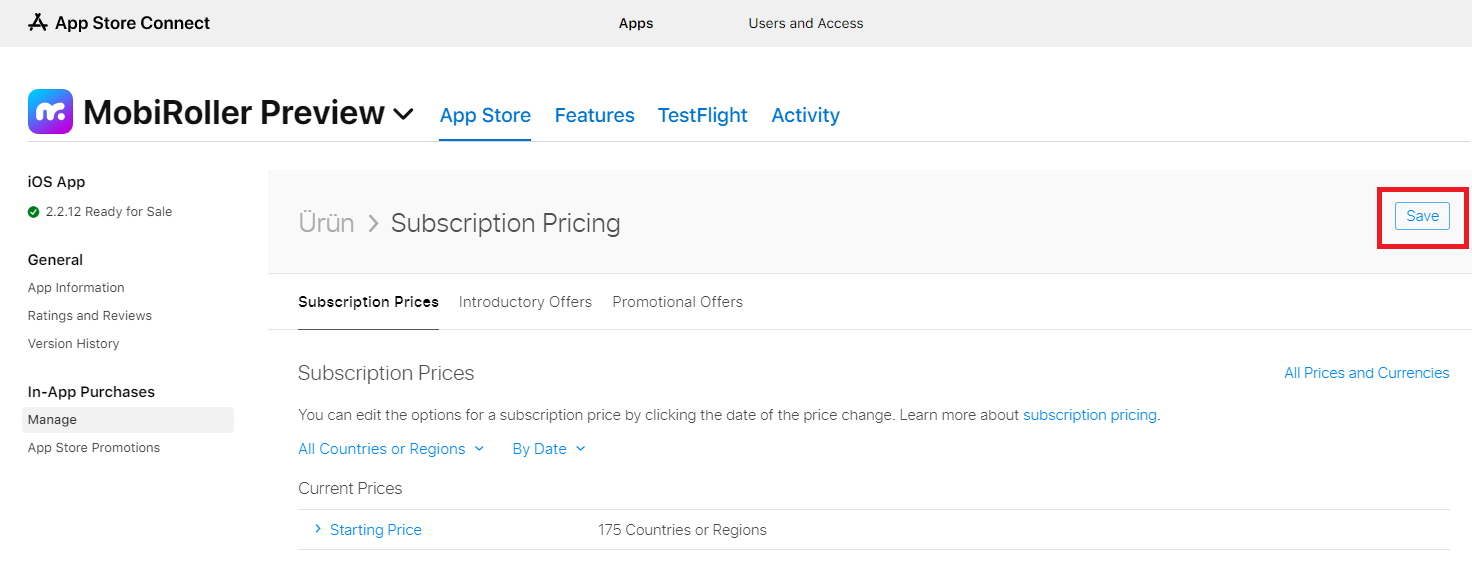
After closing, click the Save button on the top right to keep your update.
After filling in the relevant fields, click the Save button to save.
If you are adding products to Mobiroller and Apple for the first time, click the In-App Purchases button.
Daha sonra eklediğiniz ürünün sağ üst köşesindeki App-Specific Shared Secret butonuna tıklayın.
Click the Generate App-Specific Shared Secret button from the small window that pops up.
After clicking the button, you will see a code. Copy this code and Do Not Lose it. You will use this code in the Mobiroller panel.
After copying the code, go to your Mobiroller panel and click the In-App Purchase button from the Monetization tab. If you have not entered this tab before and made your settings, click now.
After activating the Settings section of the code you copied, paste it into the iOS Shared Secret Key section, and press the Save button.
Then click the Add New Product button.
When the new product adding page opens, you must enter the information on the product you want to add. Remember, since the product you add here should be the same as the product you added to Apple, you should not enter the different information. If you have multiple language options, you must enter product information in those languages for each.
Title: You can enter the title of the product that the user will see before clicking the buy product button.
Description: You can enter the description of the product that the user will see before clicking the buy product button.
YouTube Video Link: You can enter the product introduction video that the user will see before clicking the buy button.
Purchase Button Text: After the user enters the product detail, you can change the name of the button that will direct the purchasing button here.
Detail Page Button Text: After the user has entered the product details, you can change the name of the button that will direct it to more details.
Detail Page Link: After the user has entered the product detail, you can enter the link assignment that will direct it to more
Promotional Pictures: You must enter the promotional pictures of your product here. You can upload max. 3 images. The size of the images must be 754×540 and have a JPG, JPEG, PNG, or GIF extension.
Included Screens: You can select the screens on which the products will appear.
Other Settings: When adding a product in the Mobiroller panel, you should write the Product ID you created in Apple (you can go back to the Product ID section and read it by clicking here) in the iOS Product One-Time Sales ID section in the Market Information section. Then Activate the button below and Save. If you turn off the active button, your product will not appear in your app.
After registering, you will be directed to the page where you can see your products on a list. You can edit with the pen icon or delete your products by clicking the trash icon of your products.
Non-Renewing Subscription
If you choose the Non-Renewing Subscription option, you will see the parts you need to fill in.
Reference Name: The reference name is the name that will be used in App Store Connect, Sales, and Trend reports. It will not be displayed in the App Store, so you can enter any name here. This name must not be longer than 64 characters.
Product ID: You must enter a product name in this field. It must contain letters and numbers. It must be a unique name and even if you delete the product, you can not use it in another product. So you have to enter carefully. You will also use this code when entering the same product in the Mobiroller panel.
Availability: After placing a tick here, you mark the product as ready for in-app purchases and start waiting for approval from Apple.
Pricing: In this section, you must select the price at which you will sell your product. Current prices are available at Apple. If you are not satisfied with the current prices, you can find alternative prices when you go to the bottom of the price list. When you select the appropriate one for your product, the Other Currencies button will appear next to it, you can immediately see how much it will be sold in other countries by clicking.
The information you enter in the App Store Information section will be visible in the Apple App Store.
Localizations: You can enter names and descriptions in different languages by clicking the plus (+) button next to this section.
Display Name: The name you enter here is the part that will appear in the Apple App Store.
Description: The description entered here will appear in the Apple App Store.
After filling in the relevant fields, click the Save button to save.
If you are adding products to Mobiroller and Apple for the first time, click the In-App Purchases button.
Next, click the App-Specific Shared Secret button in the upper right corner of the product you added.
Click the Generate App-Specific Shared Secret button from the small window that pops up.
After clicking the button, you will see a code. Copy this code and Do Not Lose it. You will use this code in the Mobiroller panel.
After copying the code, go to your Mobiroller panel and click the In-App Purchase button from the Monetization tab. If you have not entered this tab before and made your settings, click now.
After activating the Settings section of the code you copied, paste it into the iOS Shared Secret Key section, and press the Save button.
Then click the Add New Product button.
When the new product adding page opens, you must enter the information on the product you want to add. Remember, since the product you add here should be the same as the product you added to Apple, you should not enter the different information. If you have multiple language options, you must enter product information in those languages for each.
Title: You can enter the title of the product that the user will see before clicking the buy product button.
Description: You can enter the description of the product that the user will see before clicking the buy product button.
YouTube Video Link: You can enter the product introduction video that the user will see before clicking the buy button.
Purchase Button Text: After the user enters the product detail, you can change the name of the button that will direct the purchasing button here.
Detail Page Button Text: After the user has entered the product details, you can change the name of the button that will direct it to more details.
Detail Page Link: After the user has entered the product detail, you can enter the link assignment that will direct it to more details.
Promotional Pictures: You must enter the promotional pictures of your product here. You can upload max. 3 images. The size of the images must be 754×540 and have a JPG, JPEG, PNG, or GIF extension.
Included Screens: You can select the screens on which the products will appear.
Other Settings: When adding a product in the Mobiroller panel, you should write the Product ID you created in Apple (you can go back to the Product ID section and read it by clicking here) in the iOS Product One-Time Sales ID section in the Market Information section. Then Activate the button below and Save. If you turn off the active button, your product will not appear in your app.
After registering, you will be directed to the page where you can see your products on a list. You can edit with the pen icon or delete your products by clicking the trash icon.


