If you want to publish your app on the Apple App Store, you need to complete the following steps to generate your IPA file.
- First, you need to have a developer account. If you don’t have a developer account, this article will help you create one.
👉 How to Create an Apple Developer Account?- The second step is to create a Bundle ID. The following article will guide you through the process of creating your Bundle ID.
👉 How to Create a Bundle ID?- The third step is to create your app on the Apple App Store and enter your app information (Description, Screenshots, etc.). The document below will assist you in this process.
👉 How to Create an App on the Apple App Store?⚠️ You cannot generate an IPA file without completing these 3 steps. Make sure you’ve followed these steps before generating the IPA file.
If you have completed all these steps, you are now ready to generate the IPA file.
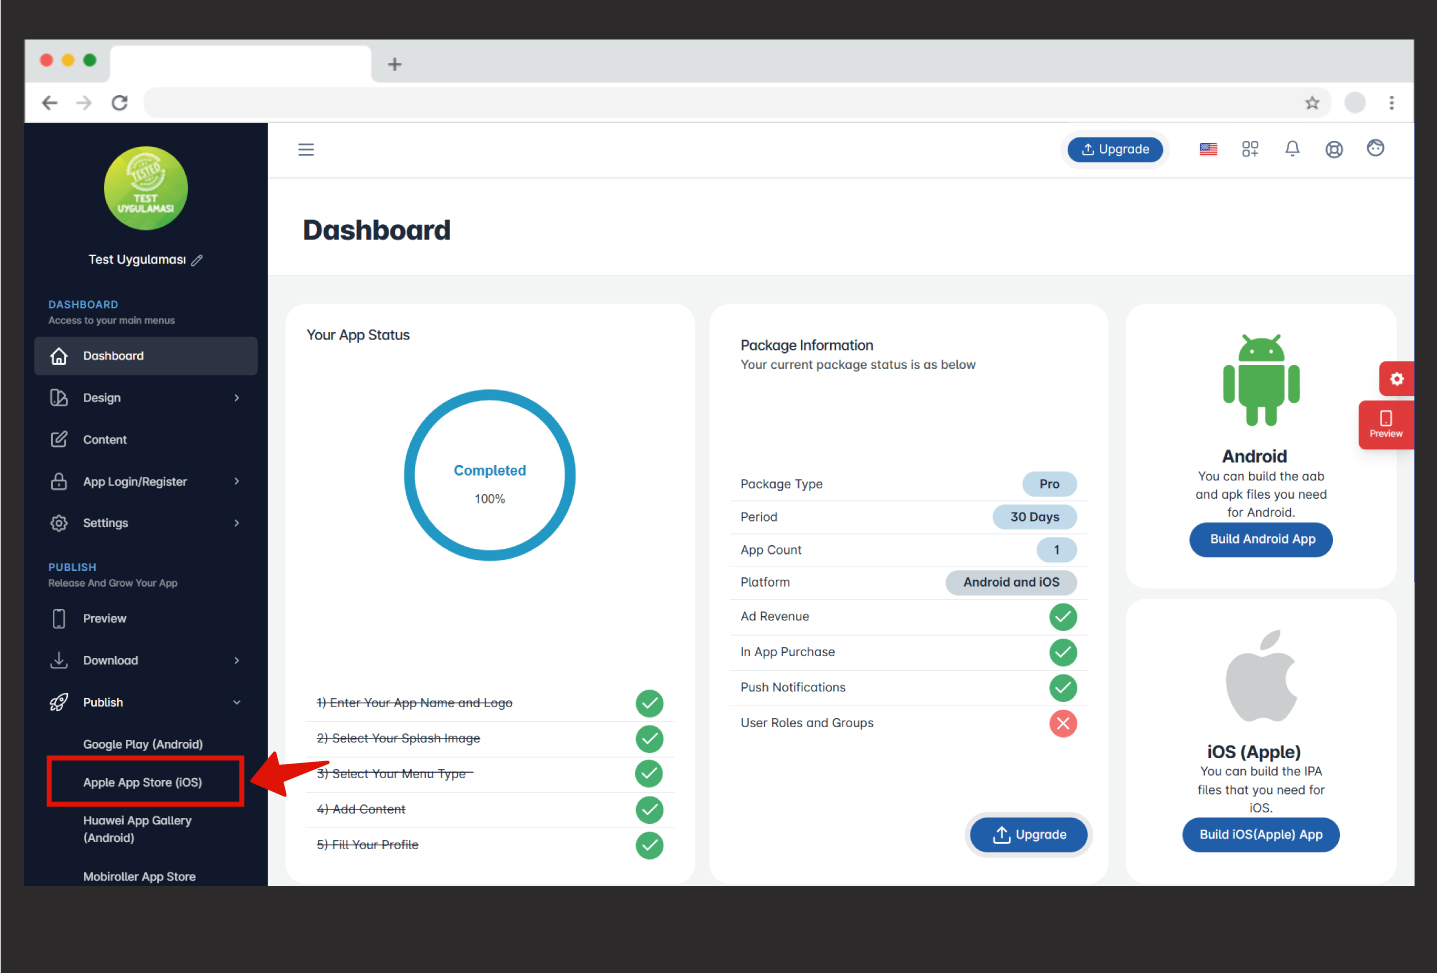
You need to go to your app on Mobiroller and click on Publish -> Apple App Store (iOS).
Click on the “Generate IPA File” button on the screen that appears.
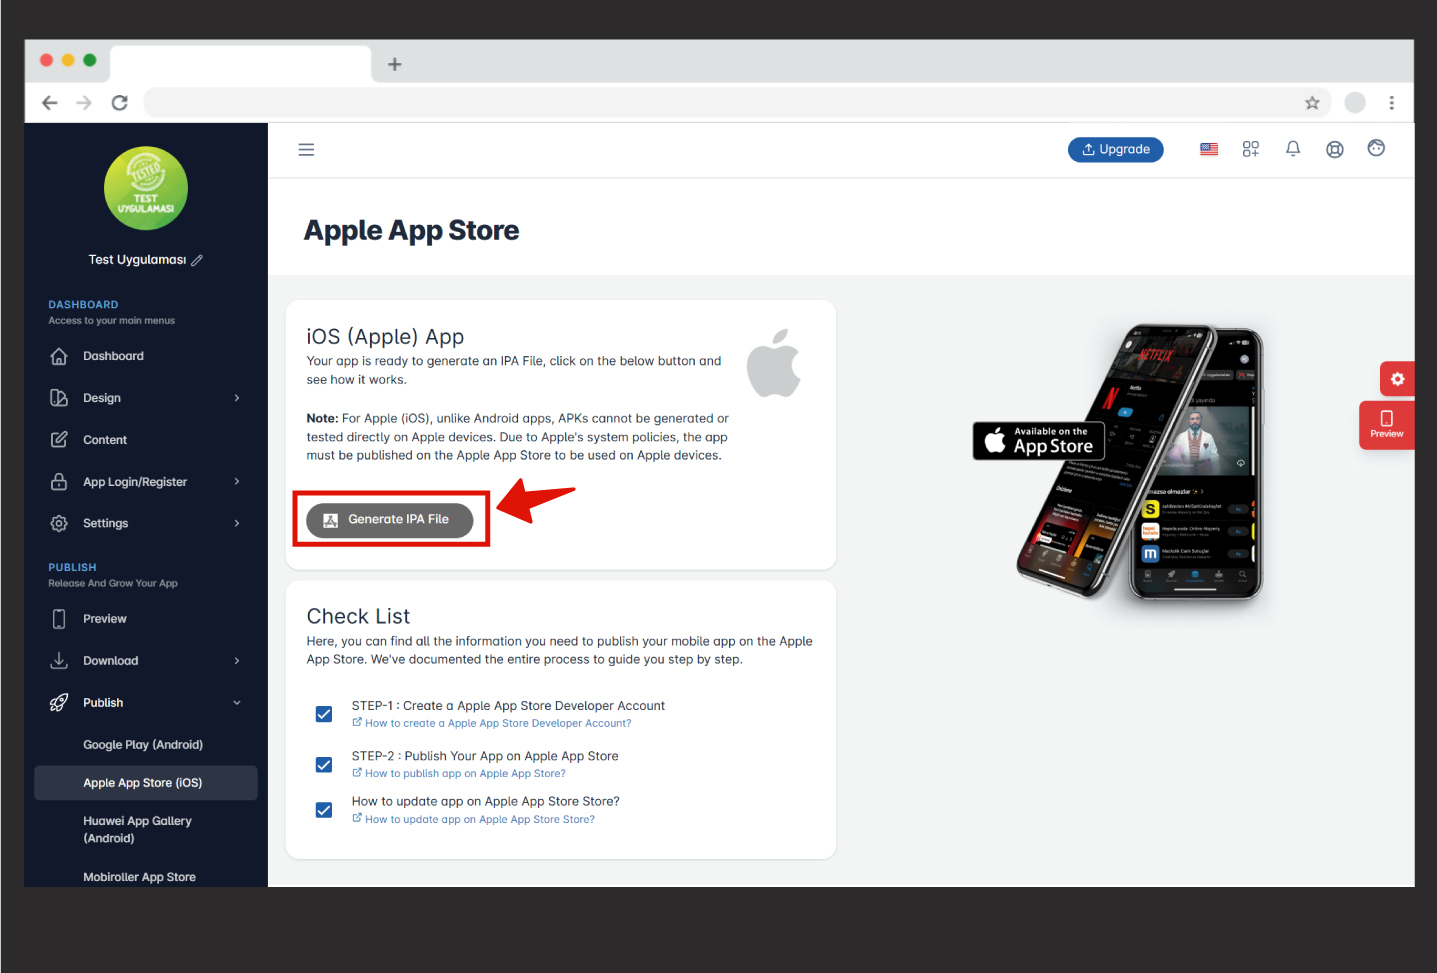
You will see our new IPA generation tool. If you have completed the steps mentioned at the beginning of this article, you can check the boxes in the to-do list located at the top right of the iOS Generation screen. Once these boxes are checked, the iOS Generation section will become editable.
IMPORTANT Note: It is mandatory to fill in all the fields in the iOS Generation section. Otherwise, your IPA generation will fail.

- Apple ID: You need to enter the email address associated with your Apple developer account.
- Apple Password: Enter the password for your developer account.
- App Name: You need to write the name you have given your app in Mobiroller.
- App Bundle: You need to enter the Bundle ID you created in the second step here. If you don’t remember your Bundle ID, go to the App Store Connect address and click on the App Information section on the left. In this section, you will be able to find your App Bundle, SKU, and App Store ID information.

- Team ID: You need to go to this link. From this page, you can find your Team ID. Enter your Team ID in the Team ID section marked as number 5 on the iOS Generation screen.

- SKU: You can find the details in Step 4.
- Distribution Certificate:
– Go to https://developer.apple.com/account/ and click on “Certificates” under the “Certificates, Identifiers & Profiles” section.

- Click on “Create a certificate” to generate your certificate file.

- Select “iOS Distribution (App Store and Ad Hoc)” from the options and click Continue.

- On this screen, you need to upload the signing request file for the certificate. You can download it from here.
- After downloading, click Choose File and upload the CertificateSigningRequest.certSigningRequest file you downloaded, then click Continue.

- After this step, you should click Download. The file ios_distribution.cer will be downloaded to your computer. Now, you need to upload this ios_distribution.cer file to the Distribution Certificate field, which is marked with number 7 in the iOS Generation screen.

8 . Mobile Provisioning
Go to https://developer.apple.com/account/ and click on the “Profile” button located in the “Certificates, Identifiers & Profiles” section.

- Next, click on “Profiles” and then click the “+” sign that appears.

- Select “App Store Connect” and click Continue.

- On the next screen, you will be asked to select the App ID. Choose the correct App ID that matches your Bundle ID and click Continue.
Important Note: The correct ID you select here is crucial. The ID contains the Bundle ID, and making an incorrect selection will lead to errors when generating the IPA for your app.

- On the screen that appears, select the certificate you created and click Continue.

- In the Provisioning Profile Name field, you need to write “Dist” followed by your app’s name (for example, “Dist TestApp”).
- After this, click Generate.

- Click Download to download the profile file to your computer. Then, upload this file to the Mobile Provisioning field in the iOS Generation screen, marked with number 8.

9. App Store ID: In step 4 of this article, we already explained this step. You should have added it while completing step 4.
10. App-Spesific Password: Go to https://appleid.apple.com/ and log in. Then, on the page that opens, click on the “App-specific passwords” button.
- On the screen that appears, click the “Generate an app-specific password” button.

- Then, in the screen that appears, you need to provide a name. You can write “Mobiroller” in this field.

- For security reasons, the system will ask you to enter your password on this screen. Please enter your Apple account password here.

- A password in the format of “xxxx-xxxx-xxxx-xxxx,” 16 characters long, will appear on the screen. Copy this password and save it somewhere safe, as you will use the same password for all of your applications. After copying it, click the Done button.
- Now, paste this password into the “App-specific passwords” field, which is marked as number 10 in the iOS Generation screen.

If you have completed all the steps up to this point, you should have filled in all the information in the section we’ve marked below. If any of this information is missing, please review the article in more detail.

- Finally, fill in the three options at the very bottom according to your app settings. If the settings do not apply to you, you can leave them blank:
- Active Background Mode: If your app plays radio or music in the background, you need to check this box.
- Deactivate Location Permission: If you don’t want to use location services in your app, check this box.
- Activate AdMob: If your app will display AdMob ads, check this box and paste the AdMob Application ID you received from AdMob into this field. Otherwise, ads will not appear in your app.
- After completing all the steps, click the Save button and refresh your page. Once this is done, click the Request (IPA Request) button.
After this process, you should send the following email to support@mobiroller.com with the subject line IPA Production Approval Request:
Subject: IPA Production Approval Request
Message: Hello,
The necessary information for IPA Production has been filled in and sent for approval.
This will notify the Mobiroller team that all required information has been completed and the IPA production process is ready for review.
After your email, our team will approve it and your IPA file will start to be generated automatically. Sometimes it may take some time to be reflected in the field on the left. You will receive an email regarding your IPA file when it is ready.
.

13. Once you receive the email confirming that your IPA file has been generated, log in to your Apple account from here. Then, click on the “Apps” button on the screen that opens.
.
14. On your app screen, you will see the “+” button in the Build section, slightly lower on the page. Click on it and select the IPA file from there. Then, click the Save button in the top right corner of the page to save it.
.
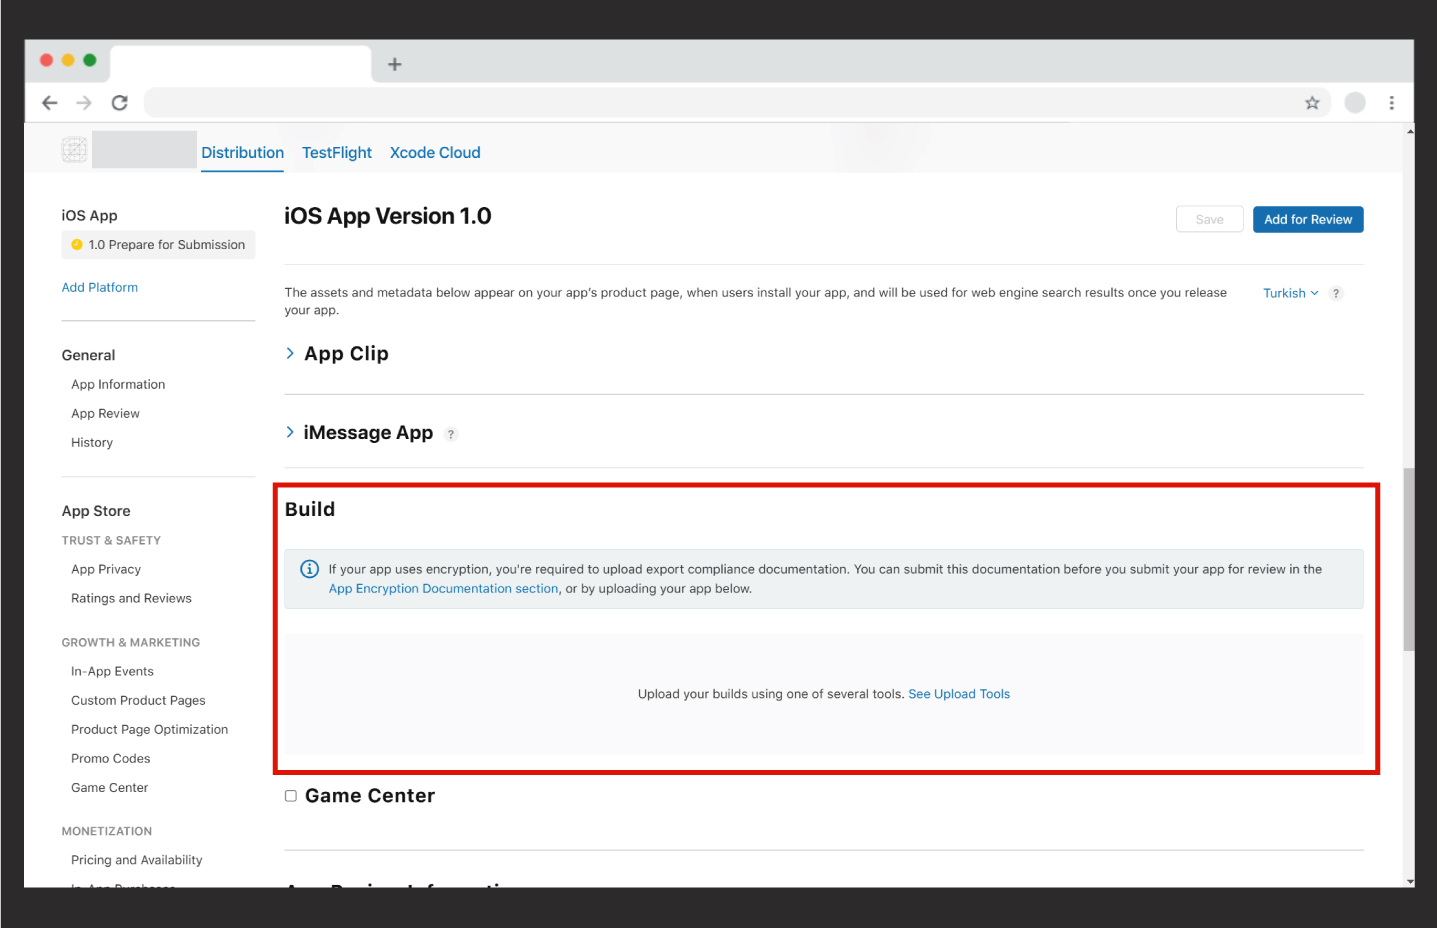
If the “+” button does not appear on this screen, it means the IPA has not been uploaded yet. However, don’t worry; if you’ve received the email confirming that the IPA has been generated, it will be uploaded here. The upload process may take some time, up to about 1 hour.
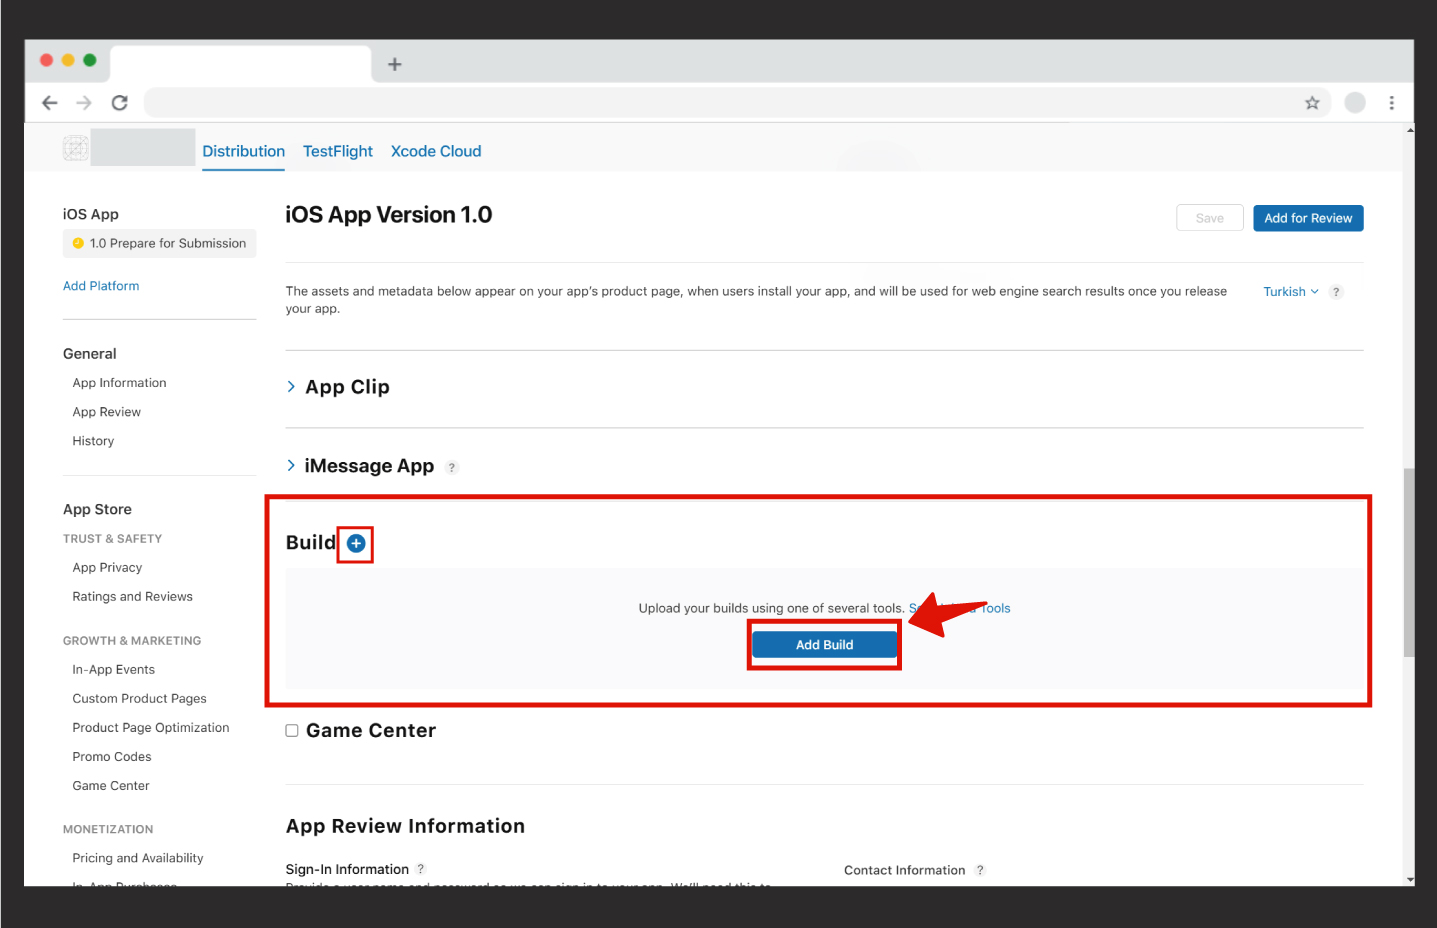
16. When you refresh the page, you can either click on the “+” button in the Build section or click on the “Add Build” button.
.
17. In the window that opens, you will see the generated IPA file. Select the file and click the Done button.
.
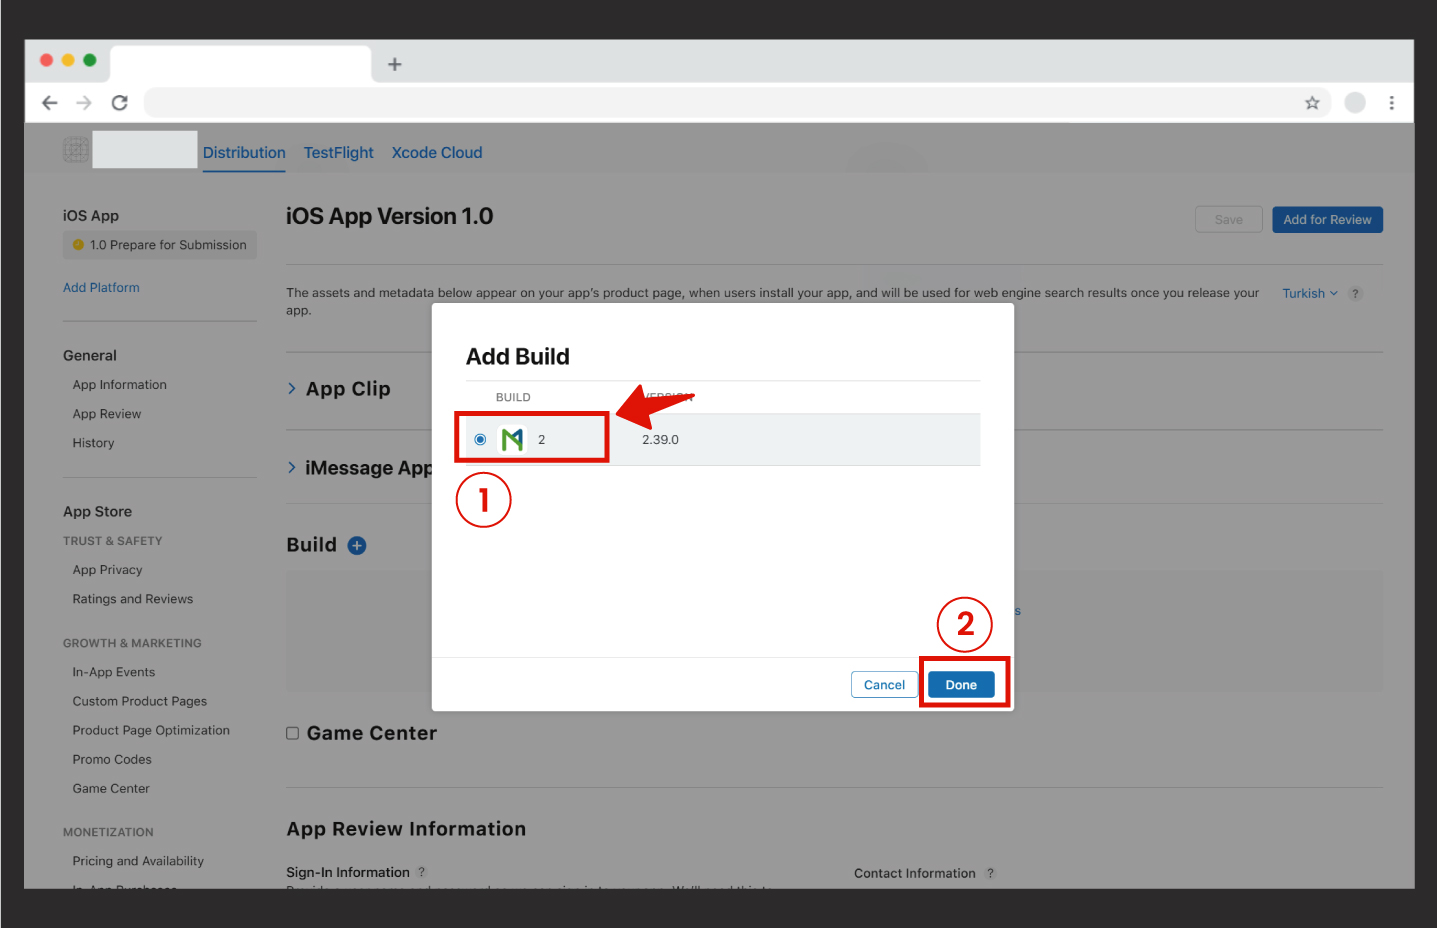
17. We have uploaded the IPA file. Now, click on the Save button first, then click on the Add for Review button located at the top right.
.
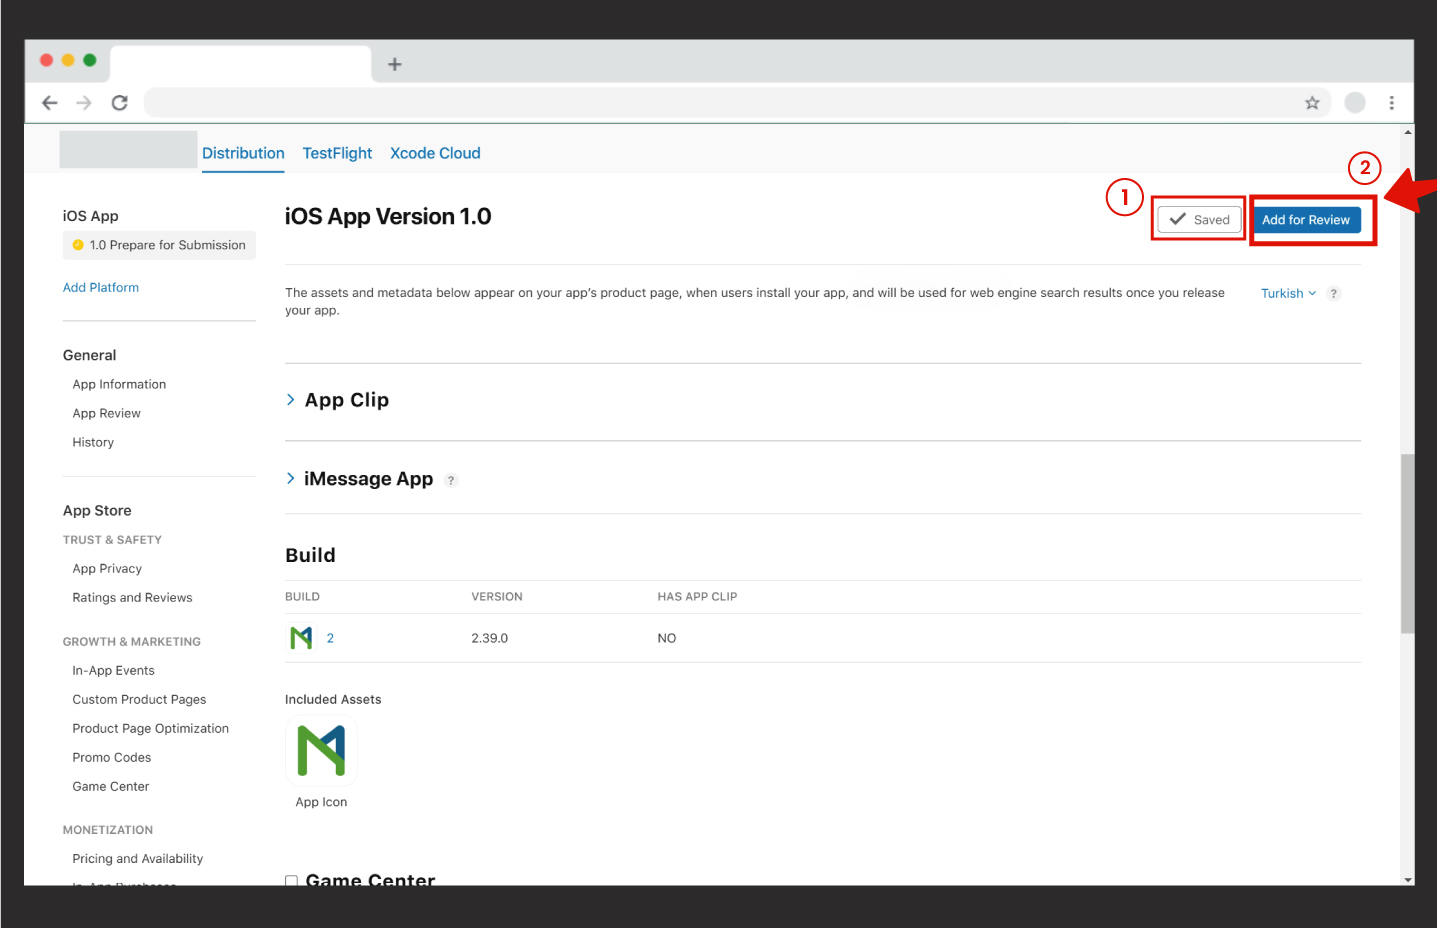
18. In the window that opens, you will see the release summary. Click on the Submit to App Review button on this screen.
.
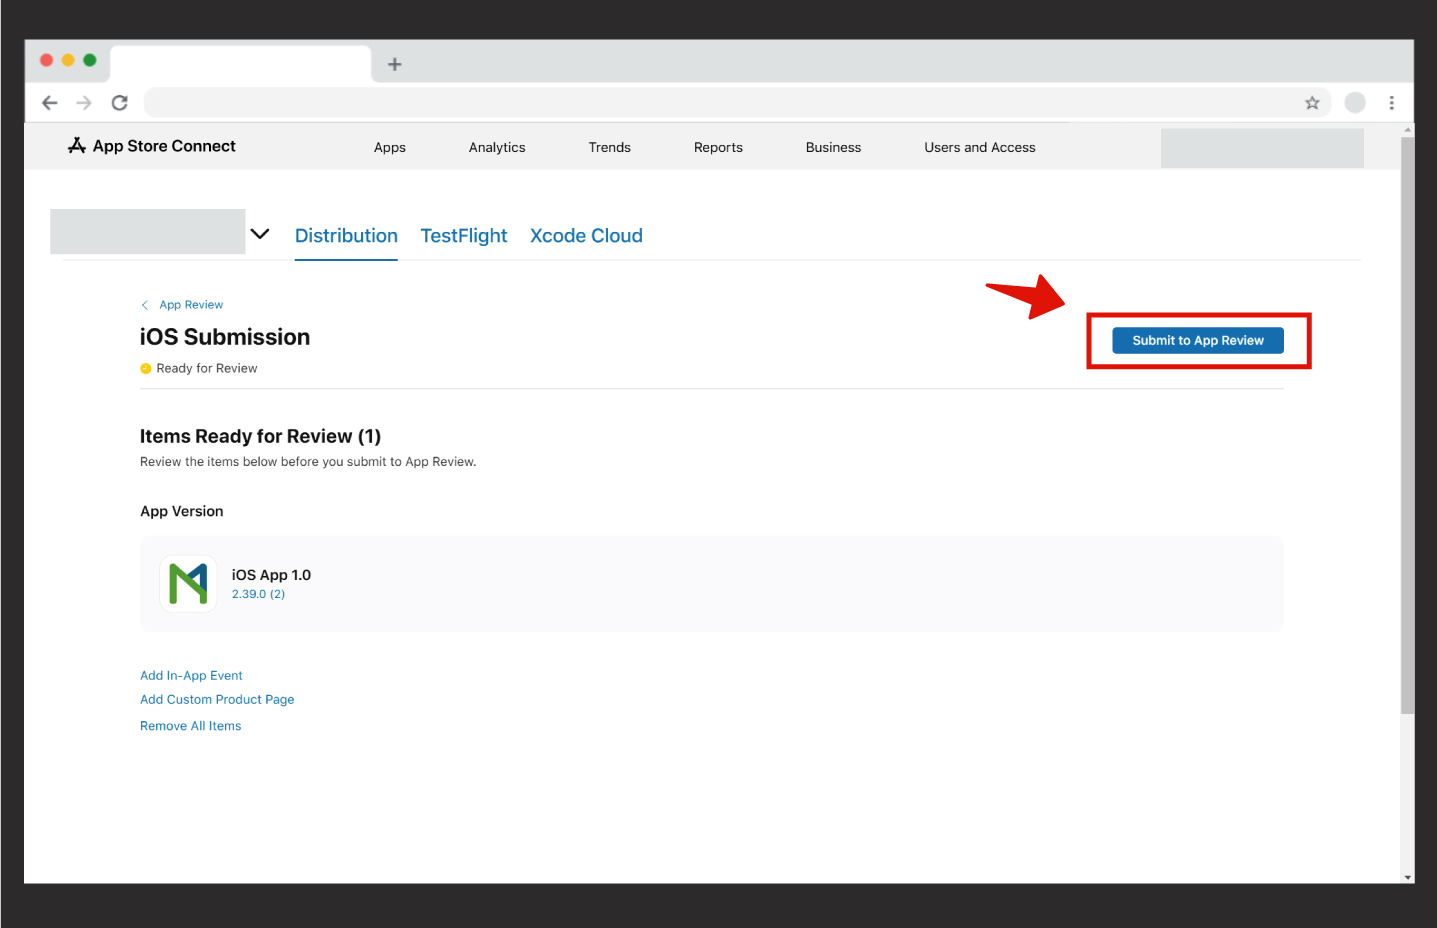
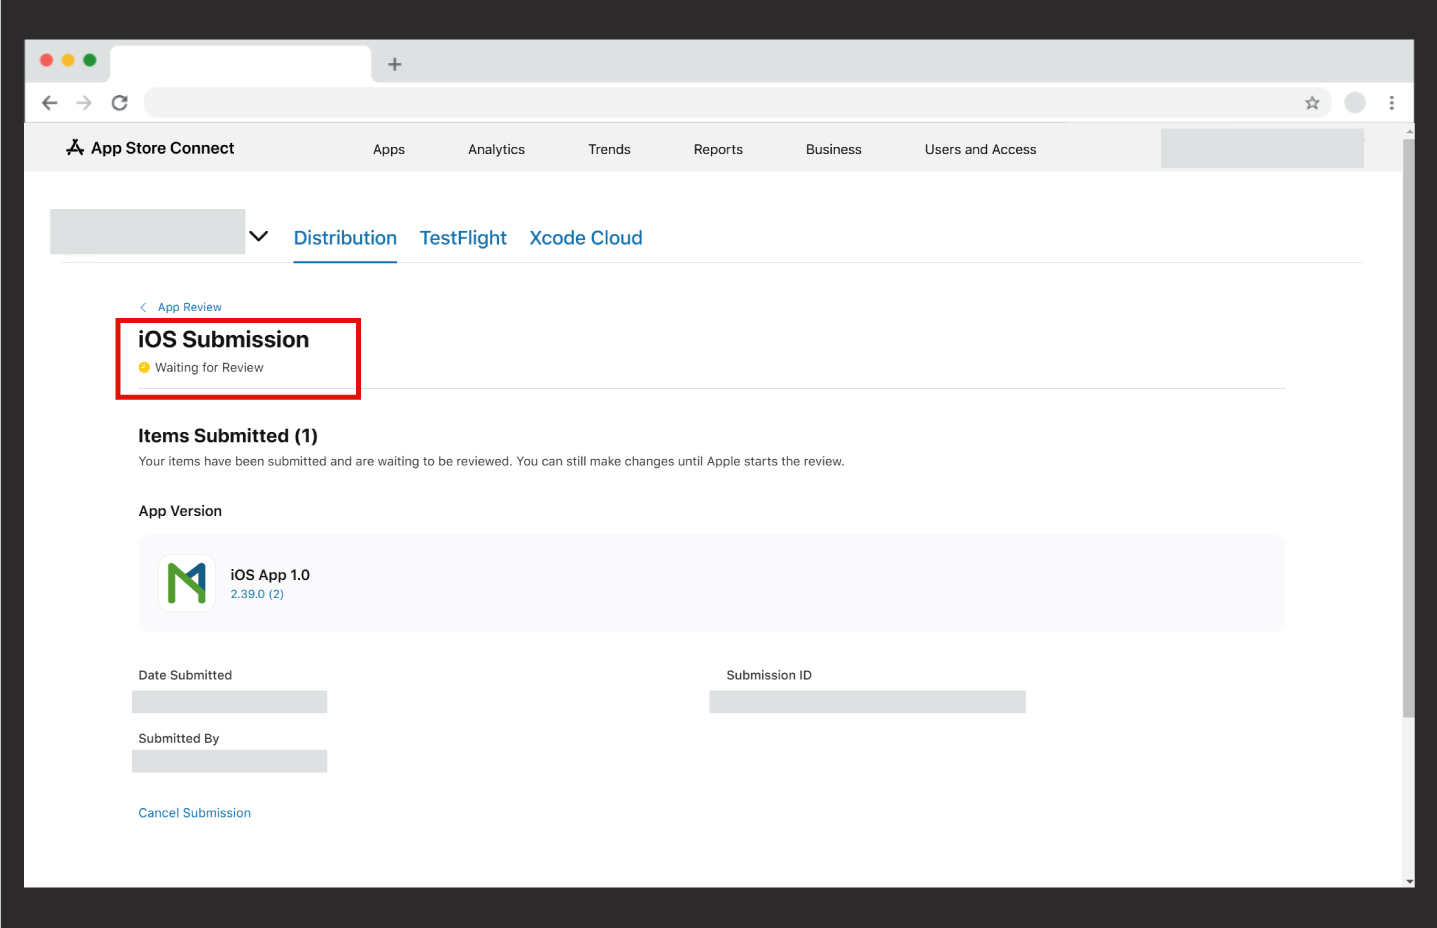
19. Congratulations 🥳
If you have followed all the steps shown in the document, you should have reached the screen below. You have successfully submitted your app to the Apple App Store for release.
. .
.
Your app has now been submitted for review. The Apple Team will review your app within 48 hours and will send you the results of the review via email.


