
It is now very easy to make a takeaway – restaurant mobile application for your business or your customers!
😎
Hello, We have prepared an article about how to make takeaway and restaurant applications with Mobiroller. By following the steps in this article, you can prepare your own takeaway mobile application or present it to your customers.
👇
Due to the pandemic that our country and the whole world are in, receiving and delivering orders with the least contact has become very important. For this reason, you can make a mobile application where you can receive and manage orders and offer campaigns with push notifications. How Does?
Let’s start! 🚀

First of all, Burgo Burger – Click here to view our sample Takeaway mobile application.
To ask a question or to prepare a mobile application, you can make a request to us via the request meeting button below.
Meeting Request Form!
🚀
login to the Mobiroller panel here to prepare the application. You can switch to the module adding page with the content button on the left menu.
We will add the modules you will use in the application with this page. First of all, we will add the E-Commerce module to the application, where we will enter the product and receive orders.
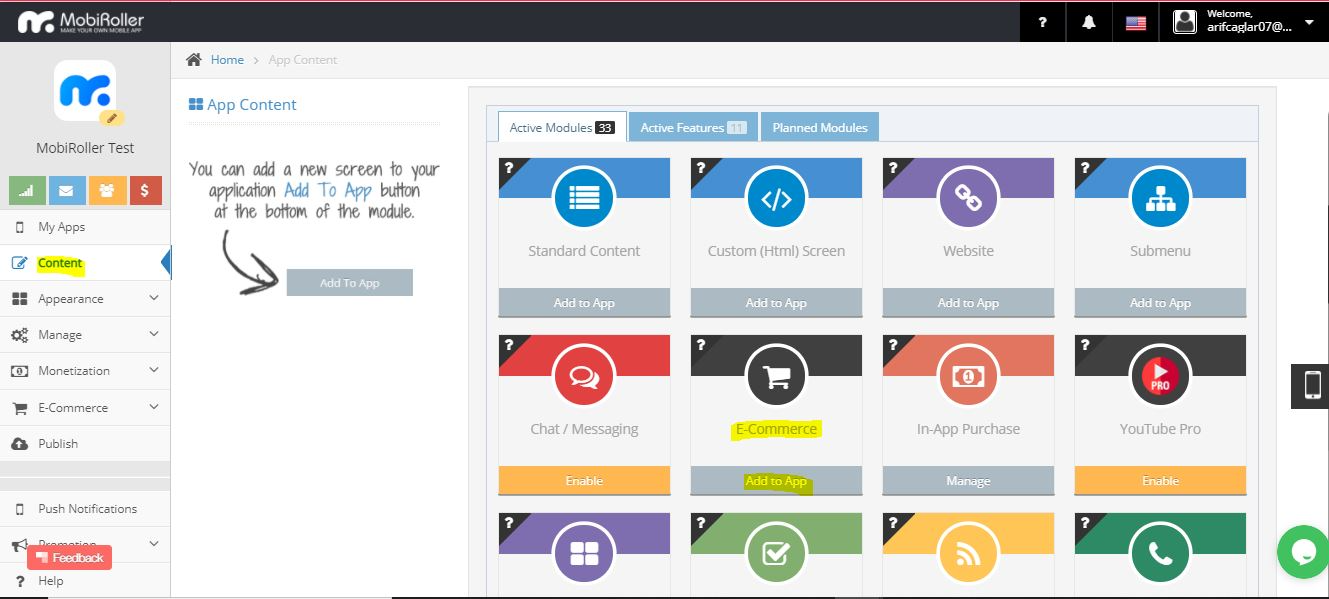
How to Add an E-Commerce Module?
To add the E-Commerce module to your application, click the Content tab in the left menu of your panel and find the E-Commerce module from the list of active modules and click the Add to Application button.
On the screen you will see, you will be asked to fill in two sections. These sections are:
Title: Your E-Commerce module will appear with this name in the application.
Short Description: This part will appear just below the app title. It is an area where you can give brief information about your sales or products.
After filling these fields, save by clicking the Save button on the top right.

After this step, you need to make settings for the module. Click the Settings tab in the E-Commerce section in the left menu.

Settings 💥
There are some sections to be completed on the settings screen:
- Definitions
- Payment Settings
- Shipping Settings

1-Definitions
The fields on the Definitions tab are as follows:
- Currency
- Delivery Conditions
- Return and Cancellation Policy
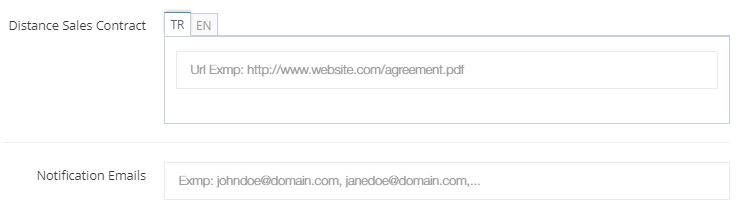
- Distance Sales Contract
- Notification Emails
Currency Unit: You can select the currency in which the products you offer for sale in the application will be sold in this field.

Delivery Conditions: In this area; You should provide detailed information and inform your users about the delivery of the products you offer for sale in the application. This area is a special screen for you to create a variety of designs. You can add videos, photos or create a screen by writing code (Software language must be HTML).
Return and Cancellation Policy: In this area; You should inform your users about the conditions in which the products you offer for sale in the application can be canceled or returned. This area is a special screen for you to create a variety of designs. You can add videos, photos or create a screen by writing code (Software language must be HTML).
Distance Sales Contract: This field is used to add a distance sales contract. However, you should not enter the contract directly in this field. The contract prepared should be transferred to the web environment or uploaded to Google Drive and the link of the contract should be entered in this field.
Notification E-Mail: You must enter the e-mail address to which your orders will be sent simultaneously in this field.
After filling these fields, click the Save button at the top. Then click on the Payment Settings tab.

2. Payment Settings
You can set the payment types that your users can use within the application on this tab.
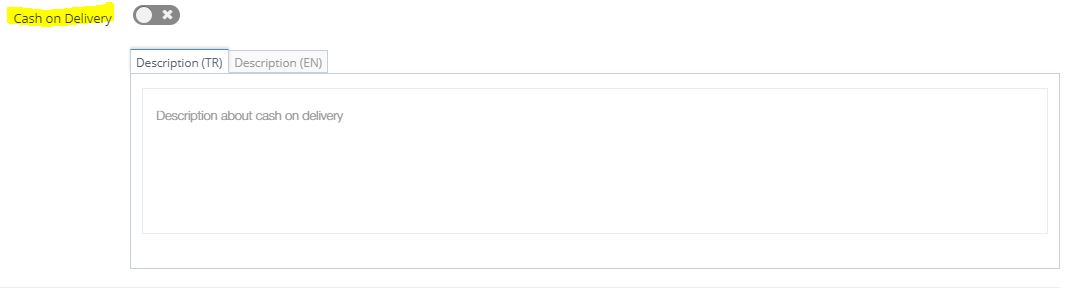
There are three different payment options you can offer to your users in this area;
- Pay at the door
- Transfer & EFT
- Payment Counter (iyzico)
Cash on Delivery: It is an option you can activate for your users who want to pay at the door. You can add the situations you want to specify in the description section.
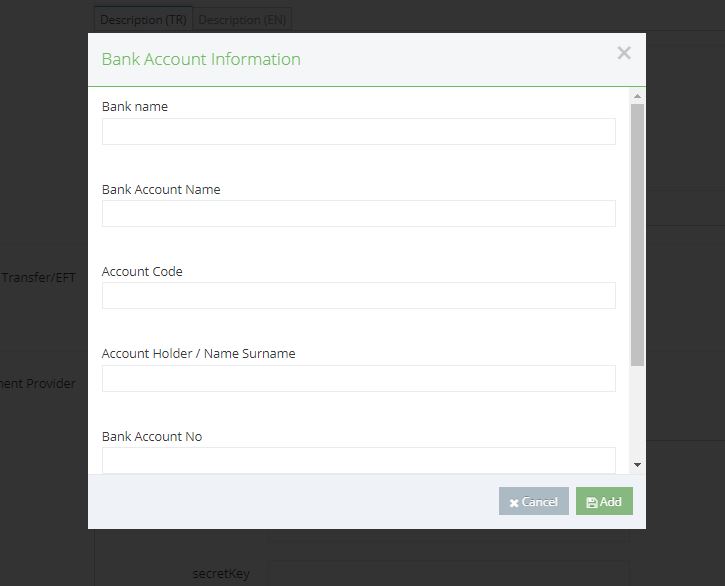
Transfer / EFT: Another payment method, the Wire Transfer / EFT option allows you to receive payment via money order or EFT by presenting your bank information to your users. When you click the Add Account button, you need to fill in the Bank Account Information section that appears on the screen. It is possible to enter more than one bank information.
Payment Provider(iyzico): By activating this field, you can receive online payments by credit card.
We use iyzico as virtual pos to receive online payments. With iyzico, you can have virtual POS without paying an initial fee, monthly fee or fixed fee. It charges on the amount you sell. Click for detailed information about iyzico Virtual Pos.
You need to open an account via iyzico and enter the apiKey and secretKey information for the virtual pos that will be defined for you in this field.

PayPal: By activating this field, you can receive payments with a PayPal account.
You can inform your users about payment via PayPal in the description section. You can enter this section in all languages in your application.
In the PayPal AccessToken section, you must purchase an AccessToken via PayPal and enter the relevant section.

To get a PayPal AccessToken, go to https://developer.paypal.com/ and sign in with your PayPal account.

Then click on your name in the upper right corner and click the My Account button in the window that opens.
Then click the My Apps & Credentials button on the left panel of the screen that opens.

Link your e-mail to your account from the section where it says Live Account. After connecting, click on your email from the same screen.

You will see the AccessToken in the window that opens. Click on it and copy it.
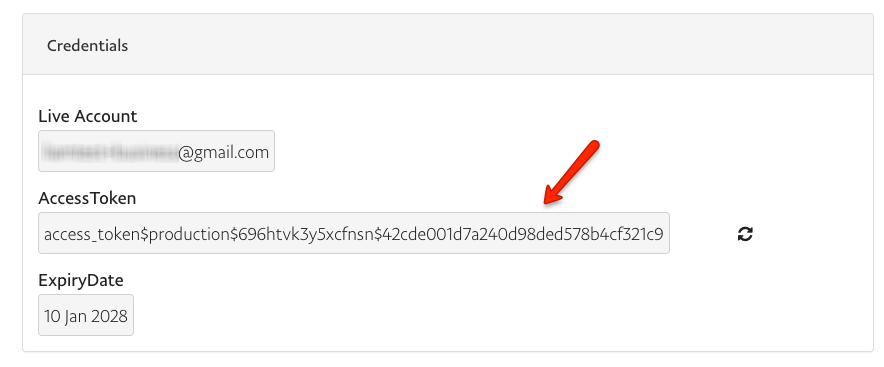
Paste the AccessToken you copied into place in the Mobiroller panel, and you’ll have your PayPal link.
After filling these fields, click the Save button at the top. Then click on the Shipping Settings tab.
3.Shipping Settings
You can make the shipping settings of the orders that your users place within the application on this tab.
There are two settings you can make in this area;
- Fixed Wage
- Free Shipping Threshold
Fixed Fee: You can set a fixed shipping fee for all products ordered by your users from this field. If you wish, you can set a separate shipping fee for each product. If you want to learn how to set a separate shipping fee for each product, you should continue reading our article.
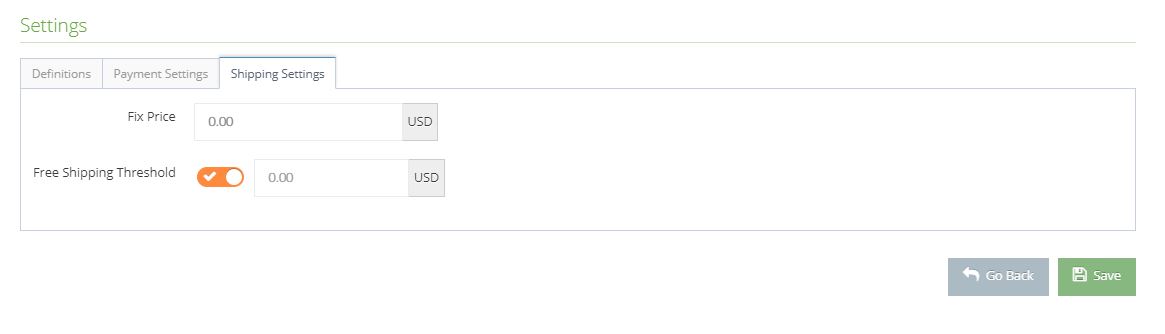
Free Shipping Threshold: You can set a shipping threshold for all of the products your users order from this field. When your users reach the price threshold you set, they can take advantage of free shipping. (Ex: Free shipping for purchases of 75$ or more.)
After filling these fields, click the Save button.
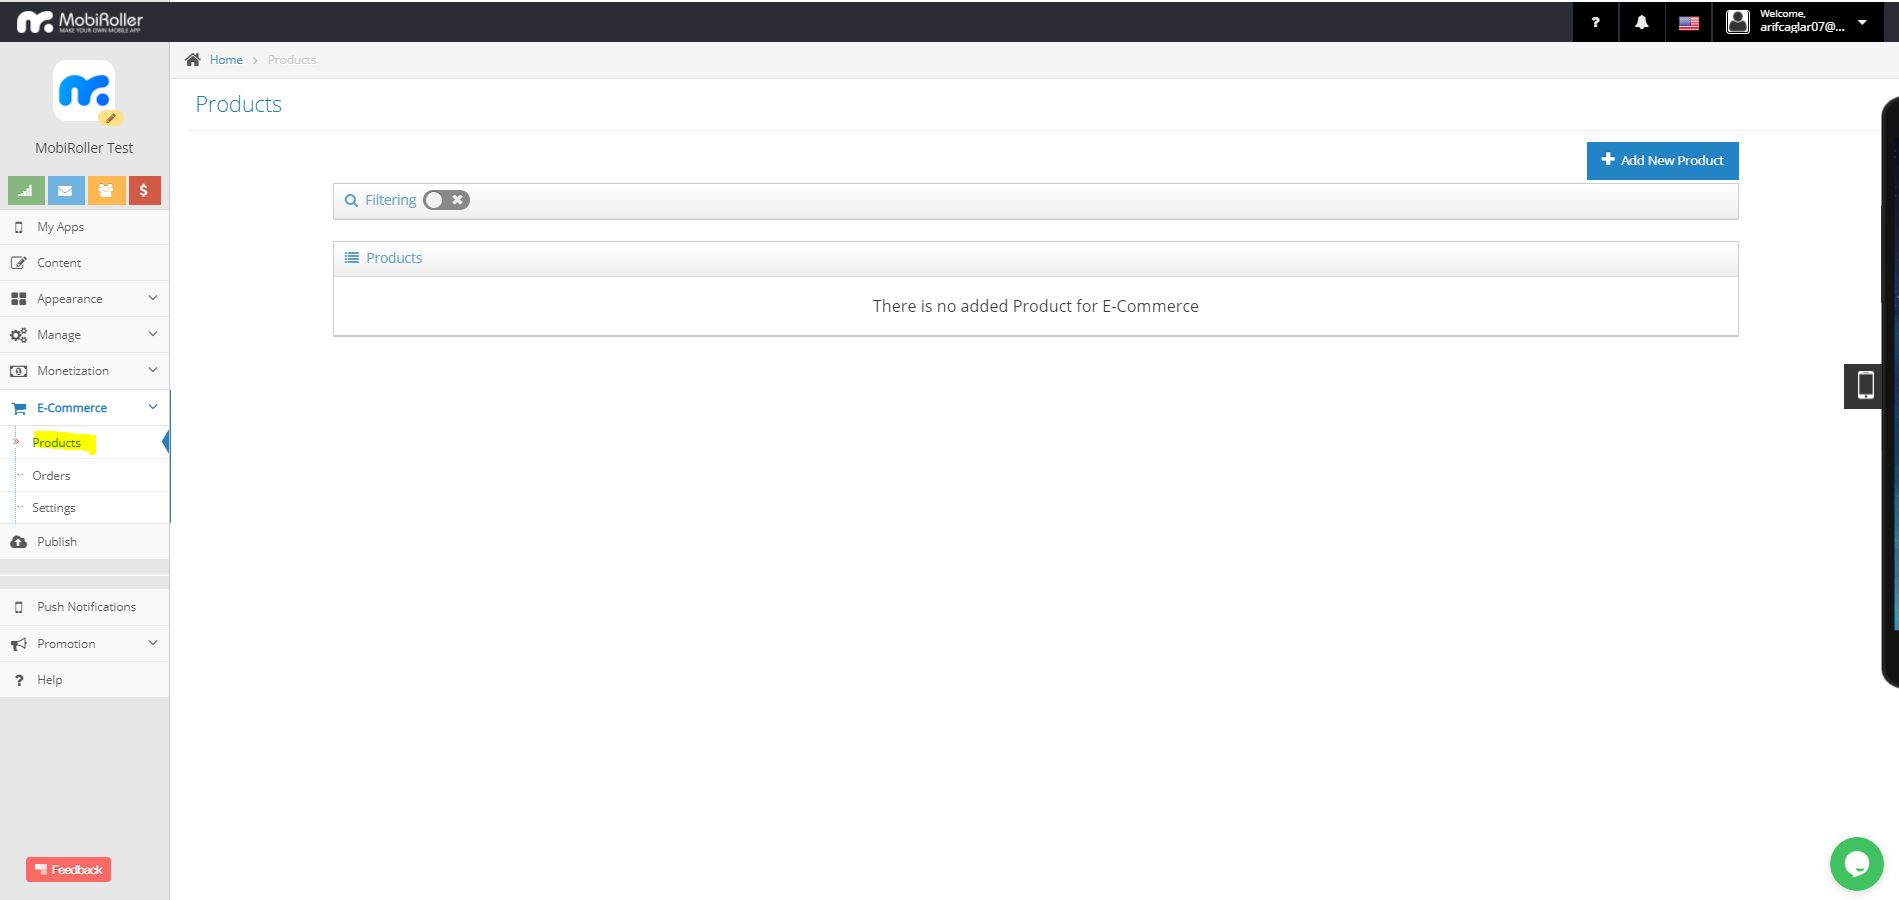
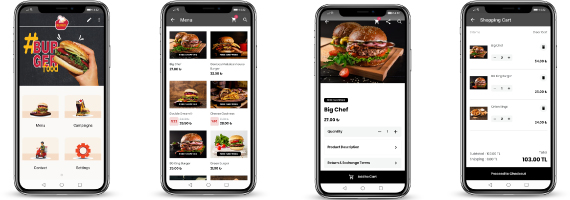
Products 💥
After the settings, you can add your products for sale.
Click on the Products button in the E-Commerce tab in the left menu. You will see a blank product add page.
Click on the Add New Product button at the top right.
There are some sections to be completed on the Add New Product screen:
- Product Information (Information that will appear in the application)
- Product Information
- Product Images
In the section of adding new products, you must enter the product information.
Product Name: Write the name of your product that will appear in the application in this field.
Description: This is the part where you can explain your product and explain its features. In this area, you need to create a detailed and attractive section for your sales.
The description section is designed as a special screen so that you can create a description field as you wish. You can design and install as you wish. You can make additions with photos, videos or source codes.
The second section is the field that contains product stock and price information.
Stock Code: You must enter an inventory code of your product. There is no rule for this code, and you can enter any code you want.

Product Price: You can enter the price of your product in this field. The price you enter must be the price including taxes.
Discounted Price: If the product is sold at a discounted price, you can enter the discounted price to show it. The old price and the discounted price will appear as a discount in the application.

Free Shipping: If you activate the Free Shipping button, the free shipping phrase for the product you are adding is automatically added to your application.
Shipping Fee: If you have set a fixed fee for all products in the Settings section, you can click the Fixed Fee button. If you want to set a product-specific shipping fee, you need to activate the Custom button and enter the price.

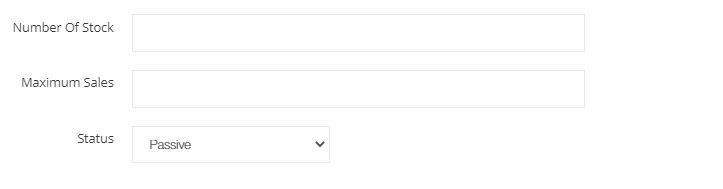
Number of Stock: Enter the number of products in stock in this field.
Maximum Sales: You can determine the maximum number of orders your users can buy from this product at one time.
Status: Three options are offered in this area; Passive, Active and Planned. If you choose passively, the product will not appear in the application. If you choose it actively, it will come with active shale in the application or continue if it is already on sale. If you mark as planned, the product will be actively sold on the date you specify.
You must add the pictures of your product to the Product Images section. Eco Package users can upload 1 image, Pro package 3 images, Business package users up to 10 images.

After filling these fields, click the Save button. Thus, you will add your product to your application.
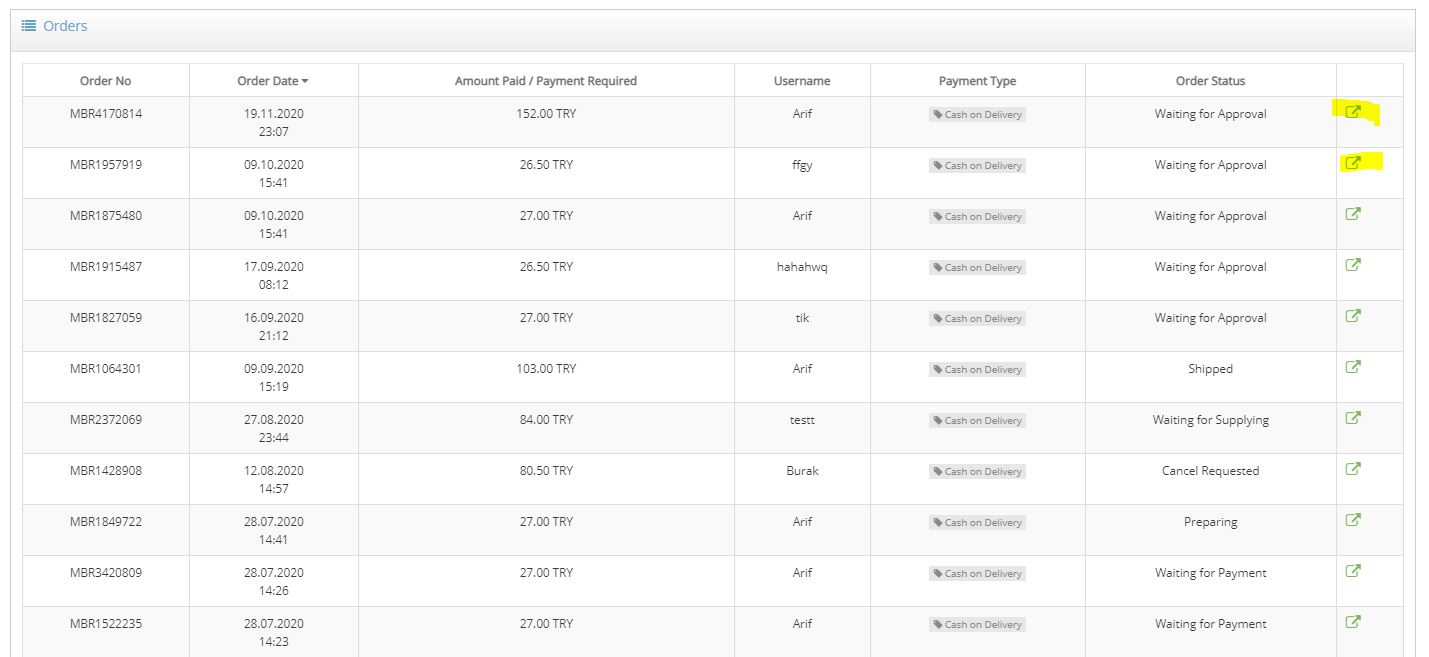
Orders💥
After adding your products, you can manage your incoming orders. Orders section is the screen where you can see the orders you have received from the application in detail.
Click the Orders button on the E-Commerce tab in the left menu.
The Orders screen consists of two parts:
Filtering: If you activate the filtering button, you can arrange your orders with a certain filtering. Filtering is temporary, it only helps you organize your order list and only you can see it. In particular, it can help you find an order you are looking for easily from your long list. You can also use the filtering feature while listing your products.

Orders: From this section, you can see all your orders collectively. If you click the window icon on the right of any order, you can access the detailed information of your order and make changes in its status. Orders that have not yet been reviewed will appear in orange in your list.
The first section on the detailed order screen is about the payment information. You can check the selected payment type along with the payment status, Order date, Price and Order quantity from this field.

The second part includes buyer information. From this section, you can access the name, surname, e-mail and telephone information about the recipient.

You can reach the information, delivery and invoice addresses of the products ordered from the third part.


Order transactions part is important for informing the customer. If you want, you can inform your customer with the changes you make in this area. You can change the order status, add a note or enter the tracking number and company if it is a product to be shipped. If the box in the notification area is checked, you can inform your customer with this information when you click the Save button.
From the order transactions section, you can see the changes and movements made on the order on the timeline.

💡
Congratulations, if you have made these settings, you have added the E-Commerce module.
Now we can talk about other modules that will add value to your application:
- To enable your customers to contact you; You can use one of the contact, form or call immediately modules.
- You can use the message box module to automatically save the instant notifications you send. You can create a campaign module by changing the mobile title to Campaigns.
- For your social media accounts, related facebook, twitter, instagram etc. you can use modules.
- By adding the settings module, you can give your users the chance to change the application settings.
You can prepare and launch your application with the menu type and design you want.
Burgo Burger – Click here to view our sample Takeaway mobile application.
To ask a question or to prepare a mobile application, you can make a request to us via the request meeting button below.